Showing posts with label painting. Show all posts

Tuesday, May 29, 2018

Plates, Proclamations and Prophecies - Fifth Year Harry Potter Party Decor

Sorry, I never posted pics of our 5th year Harry Potter party decor from back in Nov.  It was all about Umbridge, the Ministry of Magic and OWL's.  Among our many existing Hogwart's decorations, we made kitty plates!:


LOTS of kitty plates!  :D


Just took a little Mod Podging kitten images onto various 2nd cake plates we found for 25-50 cents each.


We had purchased the licensed ones but they were so tiny! And cheap plastic.  :/  The largest was barely bigger than a saucer:  So, we hung them on a door.


My mom and sis found this pink jar that we added a knob with a MoM logo to.  We also colored some sugar pink with food coloring.


We also had to have some of Umbridge's Educational Decree Proclamations on the walls.  The frames are made of lightweight foam board we picked up for $1 a sheet at a dollar store painted with Acrylic Craft Paint.  They were large sheets, so didn't take much.  Ran out of time for the locks and would like to have put the box behind them to set them away from the wall like in the movie.  (I made up a template for cutting these.  If you would like to make some, I'm happy to send it to you.  Just message me by email or on Facebook.)
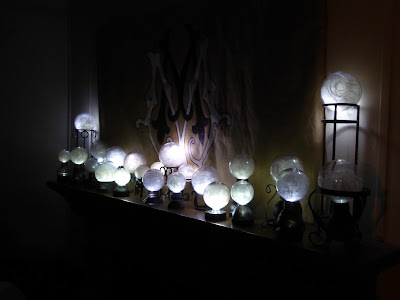


One of my favorite easy projects was making the prophecy balls from he Ministry of Magic.  We used plastic ornaments, battery LED light and angel hair from old styrofoam ornaments we had.  The based were various things from metal candle stands to plastic bottle parts spray-painted black.  Looked really cool lit up on our mantle.  (We reused our MoM logo poster from 4th Triwizard Tournament behind them.)
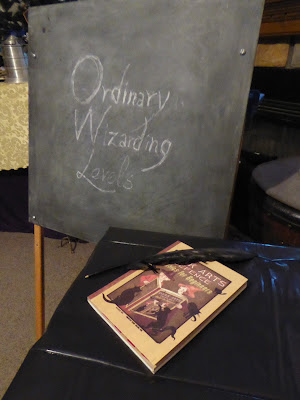


For our OWL's, we made test papers (not pictured) for each class.  And we handed out Dark Arts Defence blank journals to our students.  (I figure blank is just as useful as what was probably in them to begin with.)  ;)  We just printed the covers and wrapped them around dollar store journals.


My sis made us some really cool extendable ears!  Love them!  Plan to make them a box for next years Weasleys' shop.  She also made us some neat proclamation ornaments for the tree.  (Not pictured)


Last and definitely least was our cake.  LOL  We kept putting it off to the last minute, so ended up having the kids help make it.  If you can't tell, we were going for Mimbulus Mimbletonia, Neville's plant.  Ran out of frosting.  Kids may have been eating it while working.  :/  We skewered cupcakes of different sizes onto wire and frosted.  :D  It may not look great, but kids enjoyed making and eating it.  It was rather fun just pulling off what you wanted.  :)

Monday, November 21, 2016

Our Yule Ball - 4th Year Hogwart's Party


Had a FANTASTIC weekend!  Just wrapped up our 4th annual Harry Potter themed party.  We hosted a Yule Ball to celebrate two of our family members b-days.  Also got to go see the new "Fantastic Beasts and Where to Find Them" movie!  Thought I would give a quick preview of all the stuff we made and received at the party. My sis and her daughter overwhelmed us with some of their awe-inspiring creativity!!! (I'll probably post some more better pics when the dust settles.


As we have done for the past three years, we decorated the whole house Hogwart's style.  And, each year the theme and activities of the party match the corresponding book.  This year was all about the Tri-wizard cup, Yule Ball and Mad Eye Moody.  :)  We had a DADA earthworm fountain, foe-glass dark detector, goblet of fire for choosing champions, and much more!


We made a couple golden dragon eggs.  I used paper mache over an 8 inch tall plastic egg.  The top clasp is polymer clay.  I wanted to make it open, but found it to be too complicated for the time I had to make it.  But, I may go back and cut one of them open at a later date.


My mom and I also worked on our first attempt at a Grindylow.  He was a mixture of a couple of our patterns for the gnome head and the house elf's jointed arms.  The tentacles were a big challenge.  We plan to go back and make another slightly larger version with larger tentacles and head.


Since this was first and foremost a Yule Ball, we spent a great deal of time turning our Great Hall into silver dance hall with decorations and lighting.  :)  We taped silver wrapping paper to the walls and made faux ice castle sculptures out of plastic beverage containers and icicle lights.  We also had an extensive wizard rock and HP parody playlist for the evening.  (If you'd like to hear some of the songs:  https://www.youtube.com/playlist?list=PL5bioASvRaQqMoQGlhpkkf6ne3L2xv3ZL)

Since Harry receive b-day cakes from all his friends while Dudley was on a diet, we asked the guest to bring 3 cup cake each for a competition.  One for each birthday person and one for a "cake walk" or exchange where they could receive a different cake.  We had some really clever submissions.  (I will get the pics soon.)

One of the last tasks we planned was a "Pin the Nose on Voldemort" or "You Nose Who".  We had guests stick it to Voldemort by hanging two laminated Voldy Faces on the wall with a selection of noses to pin him with. (Will get pics.)


For the last task, I drew up a quick Ministry banner on brown paper for above our cemetery laden mantle.  (This awesome instant cemetery is the work of Crafterella.  I received it in a craft swap a few years ago, and I just love it.)

And, speaking of craft swap, we received the craziest, coolest, most amazing items from my sis and her daughter this year!


They made us a faux stain glass mermaid window like the one in the Prefects' Bathroom.  It is so cool!  They used Gallery Glass on a textured plexiglass.


And this amazing piece!  I'm still reeling from this one!  I've wanted the hog-headed pumpkin juice pitcher since I saw it in the first movie!  She did an unbelievable job on the head details!!  :O


She even had the time to make us a textbook cd box which is perfect for our growing Wizard Rock and Audiobook collections!  We were so spoiled this year!


My sis also made some Mad Eye Moody Eyes!  She even had the thought to make a spare one removable so we can put it on the door for year seven.

So many wonderful creations.  My niece even made us another baby dragon to go with the other I posted before.  (I will get pics up when I get a chance.)  I loved everything so much.  We definitely had Xmas early this year!  (Notice the bowtruckle in there? See below.)


If you saw the bowtruckle in the book pic above, it was my first attempt at Pickett as soon as we got back from the movie.  LOL  He is simply made by cutting/wrapping a couple flower stems I had in my craft stash.  We call him "Stick-ett" (Pickett's cousin).  I did make a more detailed one for my sis later that day using wire, tape and fabric paint.  I will hopefully get some pics of that one soon.  Until then, have a Harry Holiday!

If you want to see more cool stuff, please go check out my sis's facebook page, Creepy Creations.  Jamie makes some really awesome Halloween themed stuff, too!

Friday, October 16, 2015

Gilded Cage Corset


If you follow my craft page on Facebook, you might have seen that I recently entered a corset decorating contest held by Orchard Corset.  The challenge was to embellish one of their corset styles using whatever material we wanted to.  Well, the results are in, and though I didn't place I consider my results a win for me.  I'm happy with my new corset, which probably wouldn't have been finished without the motivation of the contest.  There were some really nice entries you can see in OC's Pinterest board.


It was slightly frustrating and labor intensive, but also an enjoyable learning experience that I managed to squeeze in between my other projects.  (...and the main reason I didn't get a new witch BOO't available for this year.)


For my concept I wanted to do something with spooky trees similar to some of my witch boo'ts, but I stumbled across a raven in an image on Pinterest called "The Doorman" by Katya Horner that sparked my creativity.  I liked the idea of an illusion of a gilded cage where it looks as if you are looking in at a raven in a cage or out from behind a gate/cage at the raven in the woods.


I chose to use their 345 corset.  I purchased one that was slightly uneven at the bottom edge, so I wanted to try my hand removing the binding to correct it, anyway.  I figured the single boning channels would work well as part of the cage bars.  While I had it apart to trim the lower edge I removed the boning and labeling the pieces to put them back in order.  Removing the boning would prevent it from rusting when I dyed the beige/tan color with RIT's Aquamarine and Denim liquid fabric dye. I diluted just a little before applying it with a sponge brush.  I avoided dying the boning channels only because I was going to paint them anyway, and they are thick and would take longer to dry.  It is hard to see the two-tone color variation in the pics, but I was sorta going for a blurry shadow look for depth behind my imagery.


Once I had it dried, I wanted to try a few different mediums on my wearable cotton twill art canvas.  ;)  I drew the raven and branches in place with pencil before going over it with permanent marker.  I know marker isn't the best choice, but I really didn't want to make the panels on the corset too stiff with paint.  This corset has not been broken in, and I imagine it still needs to do a bit of stretching to conform to me.  Once I had the design on I started painting the boning channels black with craft paint.


Next, I brushed a thin coat of bronze craft paint over the black channels.  I also traced over the spiral designs with a mix of slick fabric paint in black and metallic gold that made a darker antique gold before adding some painted faux rivets to the channels.  In hind sight I find it just a little too dark to contrast with the black silhouette branches in some lighting.  I would like add a little more gold and go back over them.


After I was done decorating the corset, I found some brown bias tape to replace the bulkier double-layer tan twill binding that came on the corset.  The brown actually matches with the bronze paint pretty well.  Originally, I was thinking about using black binding and painting it like the boning channels, but opted not to thinking it would make the binding stiff and rough at the edges.


That's pretty much everything.  You can see more of the progress pics and supplies in the Pinterest board created for the contest here:
https://www.pinterest.com/mieljolie/so-you-think-you-can-decorate/

Though I really love painting my witch boo'ts and other decorative projects, it's kinda cool to be able to wear your creations.  I had a lot of fun on this.  I really want to try another.  I found an irregular 426 long line Orchard Corset in tan, but it will need way more correction before I can decorate it.  Should have some costuming and props to show in the meantime.

Friday, October 17, 2014

PUMPKIN PATCH Witch Shoe

Finished a witch shoe that's been in my work space for ages.  I've posted about it before, but finally got the details finished.  I just love how the long narrow shape of this shoe turned out.  (Daughter actually shaped the newspaper toe for me.)


With thirty-one Jack O'Lanterns all over it, I'm calling it "Pumpkin Patch".  Each JOL has a different expression.  Some are happy.  Some are sad, scared, surprised...a little of everything.  It reminds me of a pumpkin jewelry set I created for a craft swap a long while back.  They'd probably go well together.  :)  It's fun to come up with different faces for them.


One is in the center of the buckle in front.  Three in the inside sole.  Three are on the heel.  And, the rest are around the shoe along with various fence posts.


I used four copper wires that sort of sprout out the toe with flower beads on them.  And a black ruffle around the buckle to soften it up a bit.


This one is on it's way to New Zealand over the next week.  Should make it there by Halloween.  Hope it arrives safely.  **crossing fingers**

If you don't hear from me before then... HAVE A CRAFTY HALLOWEEN!!!

Friday, October 3, 2014

SKIPPY SCARECROW Witch BOO't

Finally finished a pair of paper mache witch boots for this Halloween. Whew...it's about time!


I've been working on this pair off and on for more than a year.  But, the illustrations are more elaborate then most of my work at this size.  (My hands and eyes just aren't what they used to be.)  There are four different scenes that tell the story of how Miss Witch meets Skippy, the Scarecrow.


"Miss Witch flew out on broom one day
Over rows of corn and bails of hay,
When she spied a scarecrow all alone
Perched high upon his wooden throne.

Up so high but looking low,
All dressed up, no where to go.
Crows caused him constant dismay,
Clawing and pecking him every day.

She asked him, 'How is it up there...
So far up there in the air?'.
Staring down at the ground
As crows cawed, he just frowned.

It did no good to try to balk,
For we all know scarecrows can't talk.
Oh, what poor Skippy Scarecrow would give
To sing and dance...just to live.

Miss Witch sympathized with his plight.
She pondered and conjured with all her might.
To cure him of his dreadful frown,
With a charm Miss Witch, she got him down.

Thanking her he tipped his hat,
Skipping away with a big black cat.
Skippy got his wish to be set free.
And, in the distance, Miss Witch heard... 'WHOOPIE!'"

"Miss Witch Meets Skippy Scarecrow" by mieljolie, © 2014


Here is the other side.  These are actually the first images in the series.


Here's a close up of Skippy just hangin' around.


You can own these boots, if you feel inclined to.  They're available in my Etsy store here.  Now to get a shoe finished!  Until then, keep on being Crafty!

Tuesday, September 9, 2014

New Witch BOO'ts for 2014 painted by J.Moore of Creepy Creations!


Not only is this pair the first witch BOO'ts finished this year, they are the first matching set of small boots, as well as the first collaboration with my sister, Jamie Moore of Creepy Creations.  My mom and I sculpted this small set for Jamie to paint for a commission.  I then helped put some finishing touches on them.


There are two scenes that mirror each other on each boot.  One side is of a witch holding a spider in front of a cat.


The other is a graveyard scene with an owl in a tree and a cat sitting on a tombstone.


For this set I added brass eyelets to the lace holes, which I don't normally do.  It's difficult to get them in those tight spots and tough on my hands.  (You probably won't see these eyelets on many of my pieces.)  I then tea stained some tiny lace for the lacing trying to match the antique white of the moons.  The ends of the laces were wrapped in masking tape and dipped in a metallic gold fabric paint to make them look like metal tips.  I couldn't find a gold to match the eyelets, so I mixed black with the bright gold.  It ended up a pleasantly close match.


Jamie is planning to paint some more witch BOO'ts in the future.  We've been talking of doing more collaborative work together.  So, keep an eye on her Etsy shop, Creepy Creations.  You may see a large boot, another small pair, or even an adorable ornament size we're working on.  Can't wait to see how they turn out.

I also hope to have a pair of small Witch BOO'ts and a shoe available in my own shop this week.  Just need to do some finishing touches.  Wish me luck!  I'll post here on my blog when I do.

Tuesday, October 8, 2013

Witch BOO't Update: Really Bad News

Do you ever feel that the more effort you put into something, the more hopeless it's outcome becomes?  I seem to have underestimated how busy I would be and how much time these would take to paint.  Even after starting in July, it's not looking like I will have any boots/shoes finished in time for Halloween.  And, I refuse to rush and sacrifice detail and quality.  I'm just not going to do that. However, I'm very disappointed.  I sincerely appreciate that some of you have been waiting so patiently.  And, I feel really bad letting you down.  I've been trying to fit them in between other projects.  But, I've just had very little time and too much distraction to sit down to enjoy painting.  I'm very close on a couple, but fear they won't be completely ready for sale until it is too close to Halloween.

That being said, here is where I'm at on a couple of them:


The 1st one I'v been working on is a high-heeled vampire shoe/boot.  Not sure if it's a shoe or boot?  But, it's been a fun one that has taken quite some time to create.  I've redone the toe a few times.


I still need to clean up some lines.  Also, I'd like to add some handles to the sides, but I might have to cut into the bottom to secure them.  I've got an idea for a poem about a vampire's shopping trip, but haven't started it.


This 2nd is a very long shoe with buckle.  I'm still working on the fence details and cleaning up some things.


I'd also like to play with the grass and pumpkin stem details a bit more.  I'm also halfway through a poem for it about a "Party in a Pumpkin Patch".

I have a few others in the works that are not as far along.  There are a pair of small boots with a scarecrow scene.  I may show some pics of them later, but I've got an event coming up that is going to keep me away from the blog for a bit.  With any luck, or a miracle, I may have at least one of these shoe available before the end of the month.  Again, I'm so sorry.  I'm going to be really busy this month with events.  On top of that, I'm starting to organize the daughter's 11th birthday for next month.  We're going all out on a small Harry Potter themed party.  After all, "It's not everyday your young man (daughter) turns eleven". I've got a ton of stuff to do for that I hope to post here.

Thursday, September 12, 2013

New Halloween Painting Tutorial on Etsy.com


Ever wondered how I paint my Witch BOO'ts? Or, have you wanted to paint Halloween scenes on something, but too intimidated to try?  After many requests, I've put a tutorial together that is full to the brim with ideas and techniques to help you decorate your own projects.  And, these techniques can be used on a variety of projects and different surfaces.


This follows up on the Paper Mache Witch BOO't tutorial starts with the priming and preparation of the sculpted boot and continues through to sealing with varnish.  It includes tips at every step in the process, as well as 10 techniques for copying and transferring images with suggestions on which to use for different purposes.


Also included as a bonus are 4 complete Halloween scenes and some various elements to use in them.  I've included images of how they might work on one of my witch boots and recommendations for how to apply them.


Each scenes is separated out to make it easier to alter and apply to your project.  And, each are totally different, so you have a variety of inspiration to work with.


Plus, I've included 2 pages of elements including witches, cats, skeletons, tombstones, trees, JOL's, and much more.  These elements can be used with the scenes or on their own.

Hope you like the new tutorial.  You can find it here:  https://www.etsy.com/listing/159755866/halloween-painting-pdf-tutorial  If you try it, I'd love to hear how it works for you!