
Showing posts with label holiday. Show all posts

Friday, March 7, 2014

Hogwart's Party Part Four - The Food

Good grief, it's been a long while since I posted last!  Sorry 'bout that.  I'm going to share some recipes we tried for our Harry Potter themed birthday party back in November.  I tested quite a few I found online, but I wanted the simplest recipes that provided the best taste.  Since we were going to be serving two elaborate dinners and feeding guest for 2 and a half days, I needed them to be as quick and simple as possible.


Pumpkin Juice (and Pumpkin Pasties)
  • Pumpkin Pie Filling (Already spiced, strained)
  • Mulled Apple Cider


Though I tried a couple recipes, including those that used fresh sugar pumpkins to puree from a can.  I found the simplest one tasted best, in my opinion, and was much more convenient.  By the time I was finished, I used two 30 oz. cans of Pie Filling that were already flavored with spices.  I strained it through a piece of cloth to get out as much liquid as possible.  My first attempt yielded about 1/2 cup of liquid per can.  So, I poured some apple cider into the filling and filtered it again.  The apple cider helped more pumpkin flavor pass through the filter into the liquid.  The apple cider also really improves the flavor of the pumpkin juice.  This is really convenient way to make the juice because I found the filling too runny for the pasties as it was, anyway.  So, draining out the liquid helped to make the pasties less messy.  Before I was finished, I had poured about a half gallon of cider into the pumpkin juice.  You can serve this stuff as is, chilled or warm it.


It might be interesting to note, my sister and her family took a trip to Universal's Harry Potter World this past October.  And, they brought back some treats, one of which was a bottle of Pumpkin Juice.  We tasted it in comparison with our own homemade version.  It was very close.  And, I have to agree with her.  It is better warmed.  


Pumpkin Pasties Version 1
  • Strained Pumpkin Pie Filling (use leftover from pumpkin juice)
  • Premade Rolled Pie Crusts (about 16 pasties per package of 2 crusts)
  • Cinnamon/Sugar or Icing to Taste


Again, I opted for the simplest recipes I could find or come up with.  Most wanted you to prebake the filling or add extra ingredients like evaporated milk or eggs.  I decided to just use the pie filling as is after straining.  The first pasties we attempted were using premade pie crust.  You get about 16 pumpkin shaped pasties, or you can make twice as many of the folded variety in much less time.


I cut a plastic bottle in half to use as a round cookie cutter.  You'll need two circle shaped for each pasty.  Then used a table knife to score the pumpkin lines and cut out the faces of one circle.  Then, put a teaspoon of filling on undecorated half and place decorated half on top.  Wet edges to help them stick when pressing.  Last, I cut the stem shapes out and baked.  It took a bit of time/labor that could have been saved by making cutters for the eyes, mouths and stems.

I made a few different versions attempting to sweeten the crust a bit.  I tries sprinkling with cinnamon/sugar, and glazing with icing.  In the above version I smeared a bit of pumpkin filling/juice on and lightly sprinkled with cinnamon/sugar mix.  I have to say, no matter which version, they were very cute and edible.  Although, to use up the filling from two cans, it's gonna take quite a few pasties!  Be prepared to use some filling in other recipes or have LOTS of hungry guests.


Pumpkin Pasties Version 2
  • Strained Pumpkin Pie Filling (from juice)
  • Pillsbury Golden Layers Honey Butter Junior Size Biscuits

As I mentioned, we tried many attempts at pumpkin pasties.  For this version, I used biscuit dough in a mini bundt cake pan and filled with the pie filling.  The can of biscuits made 10 pasties.  I had to split the biscuit in half and place in the pan cups;  add about a tablespoon of filling; and replace the biscuit top pressing the edges down.  (It may help to moisten the edge with a little water.)

Though the pie crust ones look the cutest, the mini bundt cake biscuit dough with filling were the best tasting.  The sweet honey butter of the biscuits and the pumpkin filling complimented each other nicely.  We also tried some pumpkin bread using our ample supply of pie filling in the same pan that turned out pretty good.  I'm thinking a green gumdrop or icing stem would really help make these look more like pumpkins.  But, otherwise, the biscuit versions were delicious, and more what I imagine a pumpkin pastie to be in the magical world.  (This bundt cake pan could also lend itself easily to making cauldron cakes.)  


Hagrid Cake
  • Chocolate Cake Mix (Devils Food)
  • White Butter Cream Frosting
  • Red food coloring
  • Green Icing
  • Round Cake Pan
  • White Cardboard Cake Box (optional)
A replica Hagrid cake was a request of the daughter.  So we made it look as much like the original in the movie as possible.  She said it was her favorite cake she had.  But, honestly, it's is hard to go wrong with chocolate cake.


Polyjuice Potion
  • Chocolate Ice Cream
  • Frozen Blueberries or Mixed Fruit
  • A little Milk
  • Hand mixer
Another easy recipe we just threw together to appear to be Polyjuice potion.  I used blueberries to alter the color of the chocolate, but you could leave it plain or color with your own ingredients.  I think a few drops of green food coloring could really make it look like the potion from the movie.  My mom found the four glasses at a thrift store.  Good eye!  We lined our plastic cauldron with a glass mixing bowl for easier cleaning.  (I wanted to try adding dry ice or making our own chocolate ice cream, but that will have to wait for next time.)


Chocolate Frogs

Frog
  • Hershey's chocolate
  • Plastic Frog-shaped Mold
  • Microwave
Decorative Box
  • Illustration found online
  • Cardstock
  • Printer
  • Scissors/Exacto Knife
  • Glue
  • Scoring Tool such as credit card or back of knife
Chocolate Frogs were a must for the party.  The ones licensed ones you can get really failed on the packaging.  However, we found the box pattern online.  The frogs were a bit more difficult, but not too bad.  I looked everywhere for a mold for making frogs.  I finally found a cheap plastic one for making soap at Hobby Lobby where I used a 40% off coupon making it cost me about $1.  Then, I just melted some chocolate bars for a minute or two (stirring occasionally) in the microwave on half power and poured into the mold.  Then, pop them into the freezer for about 10 minutes, and set out to warm and set.  Had to be gentle releasing them from the mold.  We lost a few toes.

I think it would be a good idea to wrap the frogs in foil or place on a small piece of parchment paper, so the oil in them doesn't ruin the box.  The boxes, along with those for the Bertie Bott's Beans, were printed at our local Print Shop.  I don't recommend ink jet printing that may get wet and bleed if you want something as a keepsake.  We used standard 80 lb cardstock just fine, but I recommend using something just a wee bit heavier.


Bertie Bott's Every Flavor Beans
  • Jelly Belly Gourmet Jelly Beans
  • Cardstock
  • Printer
  • Scissors/Exacto Knife
  • Glue
  • Clear packaging like that from toys for the windows
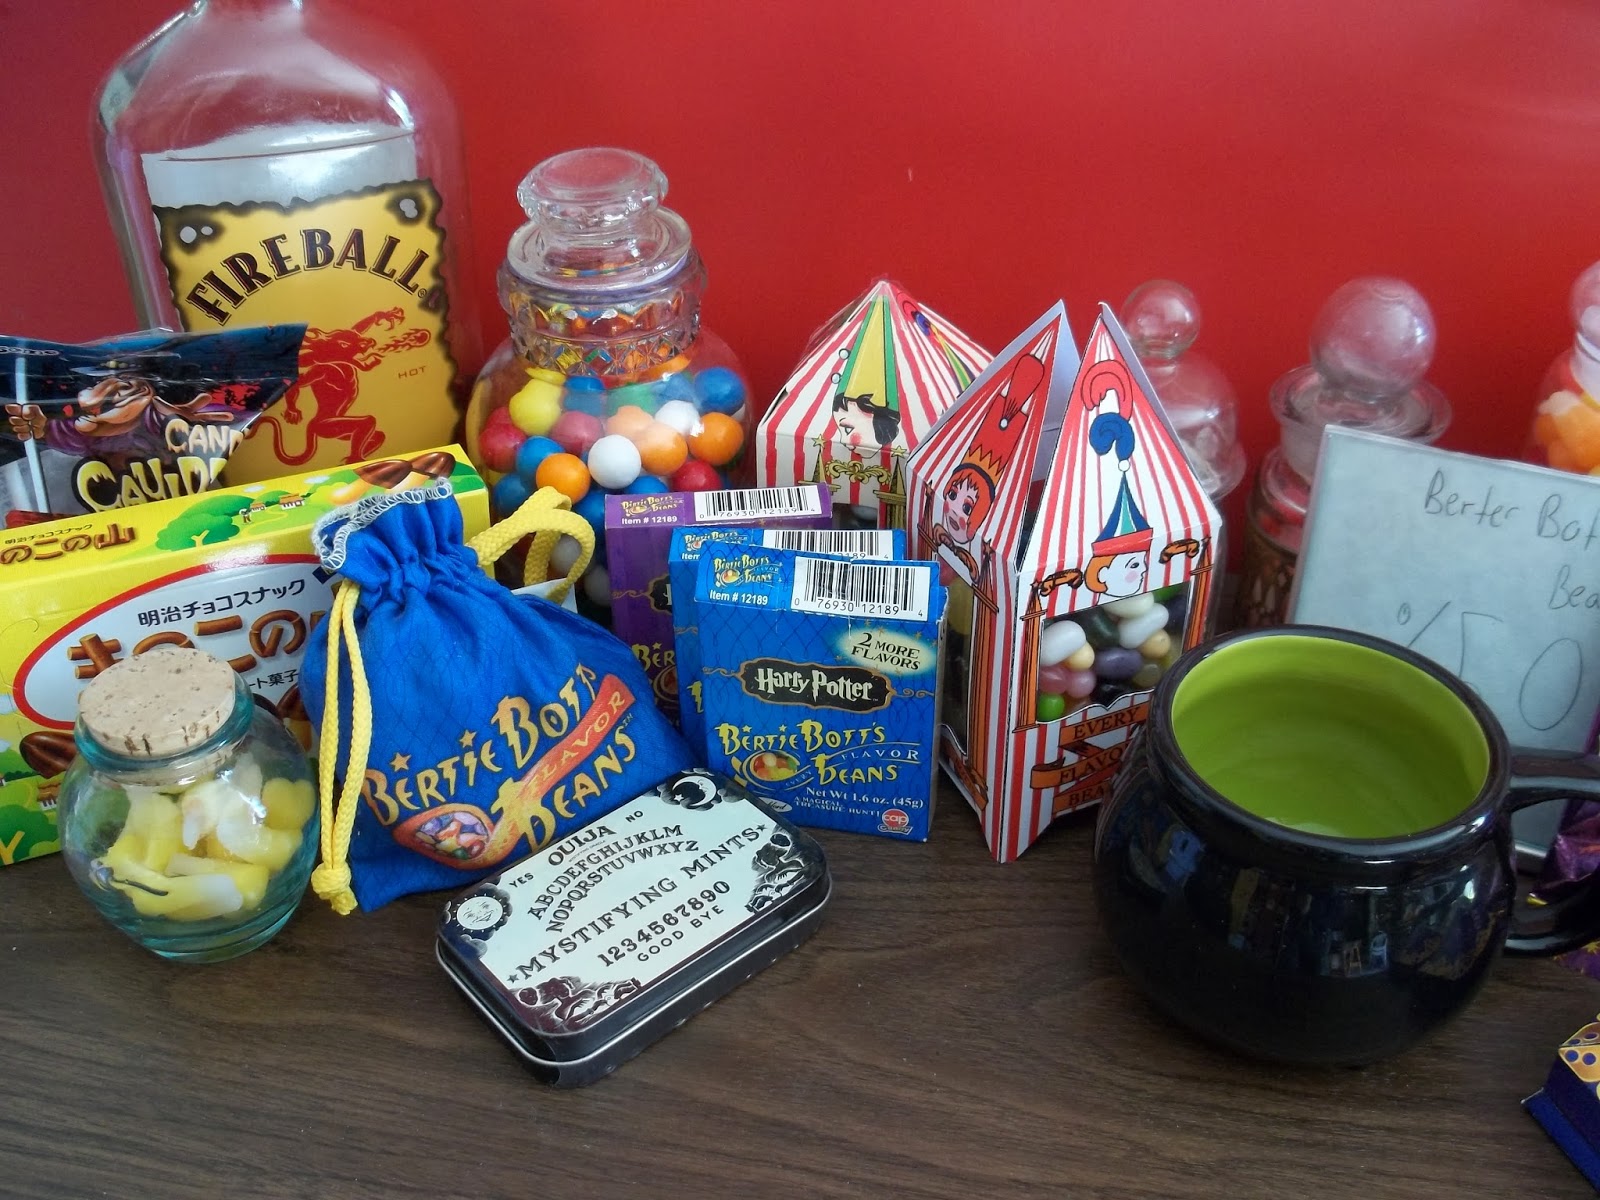
Can you spot the DIY box?  Bertie Bott's Beans had a great box in the movie that, again,  the licensed version kinda failed on.  Even the box sold at the amusement park lacks the legs that really set the box off.  I found a version online that resembled it better.  I used Jelly Belly beans because I like their safer flavors.  I used packaging from the daughter's old toys to make the clear windows in the box.


Fungus Peanuts
  • Caramel Popcorn
  • Peanuts
  • Milk and White Chocolate Chips (melted)
Even though our tombstone Death Day cake exploded, we did enjoy our Fungus Peanuts.  We will probably revisit this party theme on a later date.  We cheated and spotted these in the store, but they don't look that difficult to recreate.  But, it sure did look questionably edible in the bowl.  Haha  :)

Wednesday, December 11, 2013

Hogwart's Party Part Three - Classes

If you missed them, my last two post were of our Harry Potter themed birthday party for my daughter.  Now, I'd like to share our day of classes at Hogwart's.  They went something like this:

After a breakfast of french toast, bacon and pumpkin juice in the Great Hall, classes started bright and early at 9am with Charms where students practiced wand-waving.


Charms - We sat down in the Great Hall to learn how to levitate a feather using the Wingardium Leviosa spell practicing our "swish and flick".  The video above shows the daughter demonstrating what we learned.  This was a wonderful idea that we came up with out of the blue.  If you've ever owned a "Squirmle", or magic worm, then you'll understand the basic of how this works.  (As professor, when I got to using the words with the movements I said it a few times and gave a queue for the daughter, who was in on it, to start levitating.)


Divination - After Charms we were led to the incense laden Divination class where we had tea and foretold the future using tea leaves.  The more gruesome and depressing the better, of course! We gave extra house points for those who could name as many other forms of fortune telling as they could.  We also enjoyed some sandwiches and cookies with our tea before heading to Potions class.


Potions - In Potions (or the kitchen) we played a couple different games.  The daughter put together Snape's logic riddle from the forbidden corridor.  She put out seven different sized/colored bottles filled with different concoctions.  The group had to distinguish which bottles were poison (tap water), nettle wine (grape juice) and the potion to go forward and back (both were peppermint flavored water) based on the riddle below.  First to solve the puzzle, and those who helped, received house points accordingly.

"Danger lies before you, while safety lies behind,
Two of us will help you, whichever you would find,
One among us seven will let you move ahead,
Another will transport the drinker back instead,
Two among our number hold only nettle wine,
Three of us are killers, waiting hidden in line.
Choose, unless you wish to stay here forevermore,
To help you in your choice, we give you these clues four:
First, however slyly the poison tries to hide
You will always find some on nettle wine’s left side;
Second, different are those who stand at either end,
But if you would move onward, neither is your friend;
Third, as you see clearly, all are different size,
Neither dwarf nor giant holds death in their insides;
Fourth, the second left and the second on the right
Are twins once you taste them, though different at first sight."

Can you guess the right bottles?


We also played a guessing game Slughorn-style with mystery filled test tubes.  Each contained an ordinary edible and safe substance from the potion stores (in the pantry).  12 were liquids and 6 were powders.  Each person got to examine, smell, and taste each before passing it on.  Then, they would write there guess on a piece of paper.  Some lost house points for guessing out loud (even when wrong), and others tried to finish off a tube or two before others got to it (ie.  powdered sugar and pancake syrup).  Surprisingly, no one got a perfect score.  Though we had one who was very close only missing a couple. Bonus points were offered to those who were extra specific with their answers.  Afterward, we let the kids make their own concoctions with the leftover ingredients from the test tubes while we prepared more food.  I was even brave enough to taste a few.  Lime Kool-aid/Honey/Lemon Juice/Ovaltine?!  Eww!!  (As you can see in this pic above, we were using "Fireball Cinnamon Whiskey" for our Fire Whiskey.  We were serving the shots out of the same test tubes in the evenings. I liked the label so much, I didn't bother to cover it.)


Lastly, we sampled some Polyjuice Potion (more about this in future post) and demonstrated the magical "Repelio Charm" (not pictured, but you can find it at http://www.stevespanglerscience.com/lab/experiments/milk-color-explosion using milk, dish soap and food coloring on a plate) before heading to DADA.


Defense Against the Dark Arts - We held a Dueling Club Practice where Student were furnished with school wands sporting red or green crepe streamers on the business end.  (Imagine those ribbons on sticks that gymnasts use for floor routines.)  We let the students practice waving the wands so that the stream didn't tangle in knots.  This class was probably the highlight for our younger students.  They dueled to see who could disarm their opponent by deliberately tangling with each others "spell" streams and pulling the wand out of their opponent's hand.  Seems the winner was the duelist with the longest streamer left at the end.  :)  I really wish I'd gotten a video of the shenanigans..


Later, the kids put together a pop quiz over various Hogwarts related trivia as we waited for the award ceremony and feast.  They picked some tough questions!  We had planned to use quills and parchment for the DADA pop quiz, but alas, I ran out of time getting things ready.  We did have ink for our quills.  Did you know you can use inkjet printer ink?  You can buy the refill bottles.  And, why not mix the colors to get blood red or emerald green.


End of Term Feast/House Cup Award - After classes we ushered our exhausted students back into the Great Hall for the House Cup Award Ceremony and End of Term Feast of Turkey and all the fixings.  We tallied up the house points to find that Gryfinndor just barely beat Ravenclaw with Hufflepuff close behind, leaving Slytherin in last place.  (But, I was determine to award extra house points to the birthday girl until her house, Ravenclaw, won.)


There were many more things we'd planned for that didn't happen that I wish had:

Wand Making - Since our event was cut short we were a bit crunched for time, we had to eliminate Wand Making that was supposed to be held before Charms.  But, there are wonderful tutorials online for making all sorts of different wands from paper and hot glue, sticks, chopsticks, dowel rods, etc...


Broom Making/Flying Lesson/Quidditch - Weather didn't permit us having our Broom Making/Flying Lesson/Quidditch Match.  Otherwise we had limbs that were cut from our overgrown trees and and acres full of knee high potential straw.  I had some string and hose clamps for bundling options.  We'd planned to tie an invisible string to one of the brooms as a setup.  "Now hold your right hand over your broom and say, 'UP'."  Our class clown was going to hit themselves in the face as Ron had done in the movie.  Quidditch would also have been fun.  My sis had even made us this wonderful Quidditch trunk above.


Care of Magical Creatures (Nifflers) - I ran out of time on Care of Magical Creatures class.  We were going to set up our yurt as Hagrids Hut.  And, I wanted to make a few stuffed nifflers that could hold coins in a pouch.  Then, I would bring in an empty box with a hole chewed out of it and tell the students to find them in the yard.  The nifflers would each have muggle money in various amounts.  Winner would be the one who found the most talented niffler.


Death Day Party - We had also planned a "Death Day" party for our over forty birthday girl, but had a bit of a mishap with the tombstone shaped cake.  (Left it in a glass pan on the stove top when a burner was accidentally turned on.  POP!! Glass shards went flying everywhere.  Darn pesky pixies! But, she got to enjoy some fungus peanuts (caramel popcorn and peanuts with milk and while chocolate drizzled over it), jello worms and deviled eyeballs during our end of term feast....and the heart attack that almost ensued when we heard the noise of the exploding glass cake pan!

Next up I'll share a little about some of the recipes we used and what we think of them.

Monday, December 9, 2013

Hogwart's Party Part Two - Start of Term Sorting Ceremony and Feast

Our first evening at Hogwart's went a little like this:  


First thing after all the guest arrived and we got their luggage situated in the entrance hall to be taken to their sleeping quarters after the feast.  (The House Elves were really slipping this year.  Many of the students had to carry their own bags.)


When all guests had arrived we ushered them into the "Great Hall" (aka. the Family/Game Room). We lined all the students up to be sorted into their houses by the Sorting Hat. (You can see the sorting hat is sitting on the four legged stool to the right of the "staff table".  In this pic you can also barely see our house point jars (test tubes) on the staff table in front of Hagrid's tankard.)   House points would be awarded to their house for achievements throughout their stay, and a House Cup ceremony was planned for our final dinner together.  Each jewel was worth 10 points.  We also had smaller half jewels for 5 points.  


Of course we had the obligatory floating candles (thanks to tutorials by mizerella (http://mizerella.blogspot.com/2010/08/4-hogwarts-inspired-lighting.html).  I cut my paper towel tubes in half to make them a little shorter and have more of them.  I also went a step farther by painting the tubes with UV reactive white paint and a coat of glow-in-the-dark over that.  We had a fluorescent blacklight mounted behind the staff table that gave them a more convincing candle glow.)


The Sorting Hat spoke just loud enough for the room of students to hear it as it sang the first year hat song and announced each student's house.  (To do this we inserted a speaker into the top of my witch hat that was plugged into a hidden computer behind the staff table.  One person would hold the hat over the students head while another either chose to play a prerecorded sound or talk into a mic from another room.  We had presorted the students secretly so that it would be even for teams throughout the assorted games and things planned, as well as keep people in the same house for sleeping arrangements as much as possible.)(BTW, I made this hat many years ago during a time when I didn't have access to a sewing machine...or needle and thread for that matter.  It is all constructed using liquid stitch or something similar, basically glue!)


Once sorted we passed out badges and had our start of term feast of glazed ham and all the works.  After dinner, we explained the sleeping arrangement which was by house.  Each house's common room/dorm had a colored banner on the door and students were given direction on how to enter.  If they failed to do so correctly (and were caught), they would lose 5 house points. I should also mention that the "Forbidden Corridor" (aka. the craft room), or what jokingly became the Room of Requirement because of all the stuff I had to hide in there, was off limits "to those who do not wish to die a most painful death".  (They also lose 50 house points!)

Everyone pretty much went to bed early due to the long drive.  But, some of us stayed up to have a little butter beer and "fire whiskey".  We also had many treat from Honeydukes including chocolate frogs, Bertie Bott's Every Flavor Beans, Pumpkin Pasties, Droobles and other assorted treats.  (I'll be sharing about the food and drink in a later post.)


Mr. Sam and I were staying in Gryffindor where our password was "birthday bash".  Hufflepuffs were in the bedroom by the kitchen where they had to knock on a knot in a barrel in the rhythm of "Helga Hufflepuff" on the still life mounted to their dorm door.  And, Ravenclaws had to use an eagle door knocker and were supposed to answer a riddle.


Since we had no dungeon (or basement even), it was decided that the Slytherin's common room should be in the bathroom (the closest thing we had to a dungeon).  But, for some reason the students opted to sleep in the divination classroom (aka the living room).  Can't understand why.  ;)  Maybe their hesitation was because of Moaning Myrtle in the toilet (thanks to the daughter's drawing.)  Who knows.


Unfortunately, seems another heir opened the Chamber of Secrets during our stay.  Snakes managed to infest the entire bathroom while spiders were fleeing for their lives.  (We gave it that eerie green glow from the lake with a couple light bulb replacements.  Oh, and that's red lipstick on the mirror.  It took more than I had imagined, so had to shorten it a bit.)


Well, at least they also had convenient transport to the Ministry if they needed it.  Someone has to keep those sneaky Slytherins in line!

I'll be posting about our full day of Hogwart's classes next up.  So, stayed tuned! (If you want to.)

Thursday, December 5, 2013

Hogwart's Party Part One - The Master Plan

"It's not everyday your young man girl turns eleven, now, is it?" - Hagrid  


Being huge fans of the Harry Potter books and movies, we had to throw our aspiring witch a themed party.  Her eleventh birthday was in November. And, since we had Thanksgiving and another November birthday to celebrate, we decided to combine all these celebrations into one big overnight weekend party with family members.  We had so many ideas that we had no trouble creating an elaborate schedule for possible three day event!  After all, we didn't want to run out of fun magical things to do.  But, unfortunately, we had a nonexistent budget and unpredictable Texas weather to contend with. 

Our plan was to have a start of term feast with sorting ceremony when all guests had arrived.  Then, first thing the next morning we would start some scheduled classes throughout the day and have a second end of term feast with house cup award ceremony and possible Yule Ball.  Since our guests were to stay possibly three nights, we also planned for an optional second day of classes.  We also planned for some classes to be outdoors, but you never know what the weather will bring.  The schedule looked something like this:

Day One:
  4:00 pm -   6:00 pm Sorting Ceremony
  6:00 pm -   8:00 pm Start of Term Feast
  8:00 pm - 10:00 pm Adjourn to Common Rooms/Dormitories
10:00 pm - 12:00 am optional "Hogmeade" for drinks

Day Two:
  9:00 am - 10:30 am  Broom Making 101 (outside)
10:30 am - 12:00 am  Flying Lesson (outside)
12:15 pm -  2:00 pm Divination - tea leaves (Lunch)
  2:15 pm -  3:15 pm Care of Magical Creatures (outside)
  3:30 pm -  5:45 pm Potions
  6:00 pm -  8:00 pm Dinner in the Great Hall
  8:30 pm - 10:00 pm Yule Ball (masquerade as character)
10:00 pm - 12:00 am Adjourn to Common Rooms/Dormitories or "Hogmeade"

Day Three:
  9:00 am - 10:30 am  Wand Making 101
10:30 am - 12:00 am DADA (Pop Quiz and Dueling Practice)
12:15 am -   2:00 am Divination - (Lunch)
  2:15 pm -   3:30 pm Quidditch (outside)
  3:45 pm -   5:45 pm Charms - Levitation
  6:00 pm -   8:30 pm House Cup Ceremony/End of Term Feast
10:00 pm - 12:00 am Adjourn to Common Rooms/Dormitories or "Hogmeade"

I know it seems like a lot to put into a weekend, but this is just a rough guide for time to keep us on track.  Due to the bad weather, some guests arrived a couple days late and still others had to postpone until Thanksgiving day.  We ended up with two separate parties, but it all worked out okay.  We had to do a bit of juggling and sacrifice to make it work, and had to cancel outdoor classes completely. (Yes, I know.  "You CAN'T cancel Quidditch!"  But, we did.) We ended up rearranging for one day of classes something like this:

Day One:
  4:00 pm -   6:00 pm Sorting Ceremony
  6:00 pm -   8:00 pm Start of Term Feast
  8:00 pm - 10:00 pm Adjourn to Common Rooms/Dormitories
10:00 pm - 12:00 am optional "Hogmeade" for drinks

Day Two:
  9:00 am - 10:30 am  Charms - Levitation
10:30 am - 12:00 am Dueling Practice
12:15 pm -  2:00 pm Divination - tea leaves (Lunch)
  2:15 pm -  3:15 pm Potions
  3:30 pm -  5:45 pm DADA (Pop Quiz)
  6:00 pm -  8:00 pm House Cup Ceremony
  8:30 pm - 10:00 pm End of Term Feast
10:00 pm - 12:00 am Adjourn to Common Rooms/Dormitories or "Hogmeade"

We don't host a great deal of parties at our place, especially this elaborate.  There would prove to be challenges in the sleeping arrangements, money and time for decorations and food and overall hosting.  I would like to stress the that the utmost importance when hosting a party like this, is to have a mix of activities including a few that require minimal supervision so you can prepare for the next "class" and keep your guest fed and happy and not wear yourself out.  Keeping folks entertained so that they don't get bored and wander off to watch football was quite a challenge.  With limited time and energy, you have to remember that you can't be three places doing twenty things at once.  Many guests and even our birthday girl all helped entertain as well as prepare each activity and the food.

All in all, it was a really fun time.  Everyone was a good sport and participated.  Daughter said they enjoyed the dueling and potions class the best.  And, it was her favorite birthday ever.  (YES!!  SUCCESS!!! )  And, she wants us to host another Hogwart's party next year.  (Oh dear.  I guess we have future plans for an outside event when it's warmer out.)   But, besides the overwhelming amount of leftover sweets from this party, I think it was pretty great.  And, the best news it that we still have a little money left for Christmas.  ;)  


In the next few days I plan to share a few more detailed posts on our decorations, food recipes and games in case you need inspiration for your own wizard/witch's party.  This will actually be the first time any significant amount of our humble abode will be pictured on my blog.  It's kinda embarrassing.  She's no castle or even a looker any means.  But, we did our best to make it Hogwart's as much as we could.   :)

Tuesday, October 8, 2013

Witch BOO't Update: Really Bad News

Do you ever feel that the more effort you put into something, the more hopeless it's outcome becomes?  I seem to have underestimated how busy I would be and how much time these would take to paint.  Even after starting in July, it's not looking like I will have any boots/shoes finished in time for Halloween.  And, I refuse to rush and sacrifice detail and quality.  I'm just not going to do that. However, I'm very disappointed.  I sincerely appreciate that some of you have been waiting so patiently.  And, I feel really bad letting you down.  I've been trying to fit them in between other projects.  But, I've just had very little time and too much distraction to sit down to enjoy painting.  I'm very close on a couple, but fear they won't be completely ready for sale until it is too close to Halloween.

That being said, here is where I'm at on a couple of them:


The 1st one I'v been working on is a high-heeled vampire shoe/boot.  Not sure if it's a shoe or boot?  But, it's been a fun one that has taken quite some time to create.  I've redone the toe a few times.


I still need to clean up some lines.  Also, I'd like to add some handles to the sides, but I might have to cut into the bottom to secure them.  I've got an idea for a poem about a vampire's shopping trip, but haven't started it.


This 2nd is a very long shoe with buckle.  I'm still working on the fence details and cleaning up some things.


I'd also like to play with the grass and pumpkin stem details a bit more.  I'm also halfway through a poem for it about a "Party in a Pumpkin Patch".

I have a few others in the works that are not as far along.  There are a pair of small boots with a scarecrow scene.  I may show some pics of them later, but I've got an event coming up that is going to keep me away from the blog for a bit.  With any luck, or a miracle, I may have at least one of these shoe available before the end of the month.  Again, I'm so sorry.  I'm going to be really busy this month with events.  On top of that, I'm starting to organize the daughter's 11th birthday for next month.  We're going all out on a small Harry Potter themed party.  After all, "It's not everyday your young man (daughter) turns eleven". I've got a ton of stuff to do for that I hope to post here.

Friday, March 29, 2013

Happy Easter!!


Cross posting a tabistry basket I made the daughter for Easter out of can tabs from the Tabistry blog.  You can read more about her new basket over there.  Just thought you might like to see what I've been up to, since it's been so long since I've posted anything new over here. 

Have a Happy & Crafty Easter!!

Saturday, September 8, 2012

Have you ever wondered?...

...Do you know?
Why a witch's' shoe has a curled up toe?


One day Miss Witch put on a shoe,
but there's one thing she failed to do.
She didn't peek inside that pump.
She didn't spy a creeping lump.

Instead she brushed upon her heel
a squishy feel that made her squeal.
For in her slipper, beneath her flipper,
she almost squashed a unseen nipper.

A spider with fangs and reflexes quick
and venom that makes one feel quite sick.
It's bite caused her a great surprise.
And, the toe it bit grew twice its size.

The toe, it turned five shades of blue,
and oozed with puss and smelly goo.
The spider faired no better, I'll say.
For two of its legs were sprained that day.

For weeks this pair of grumpy gimps,
Miss Witch and the spider, walked with limps.
But instead of arguing 'bout who's to blame,
Neither again would wind up lame.

Vowing her shoes would possess ample room
Miss Witch saved the future spiders from doom.
Because any witch will tell you clear,
it's not just your toes at stake, my dear.

And, now you, too, know why they chose
Those goofy shoes with the curled up toes.
But...What's up with those pointy hats?!
Think there's room in her belfry for bats?

by Mieljolie, ©2012


Finished painting a 2nd witch shoe from the batch I posted about way back here.  This spider themed one is for my sis.  I'm calling it "Spider Webs".  She had claimed it 2 years ago when I first posted about them.  But, even though the three shoes were almost finished then, I had set them aside for other projects.  It's taken a while, but I finally got around to putting the last touches on this one.  Well, maybe.  Just one last thing I'd like to do.  I want to find a spider to hang from the toe.  I will probably try to make one out of polymer clay.


This is one of my favorite shoe styles from what we've made so far.  I think I may make some more little loafers like this someday.


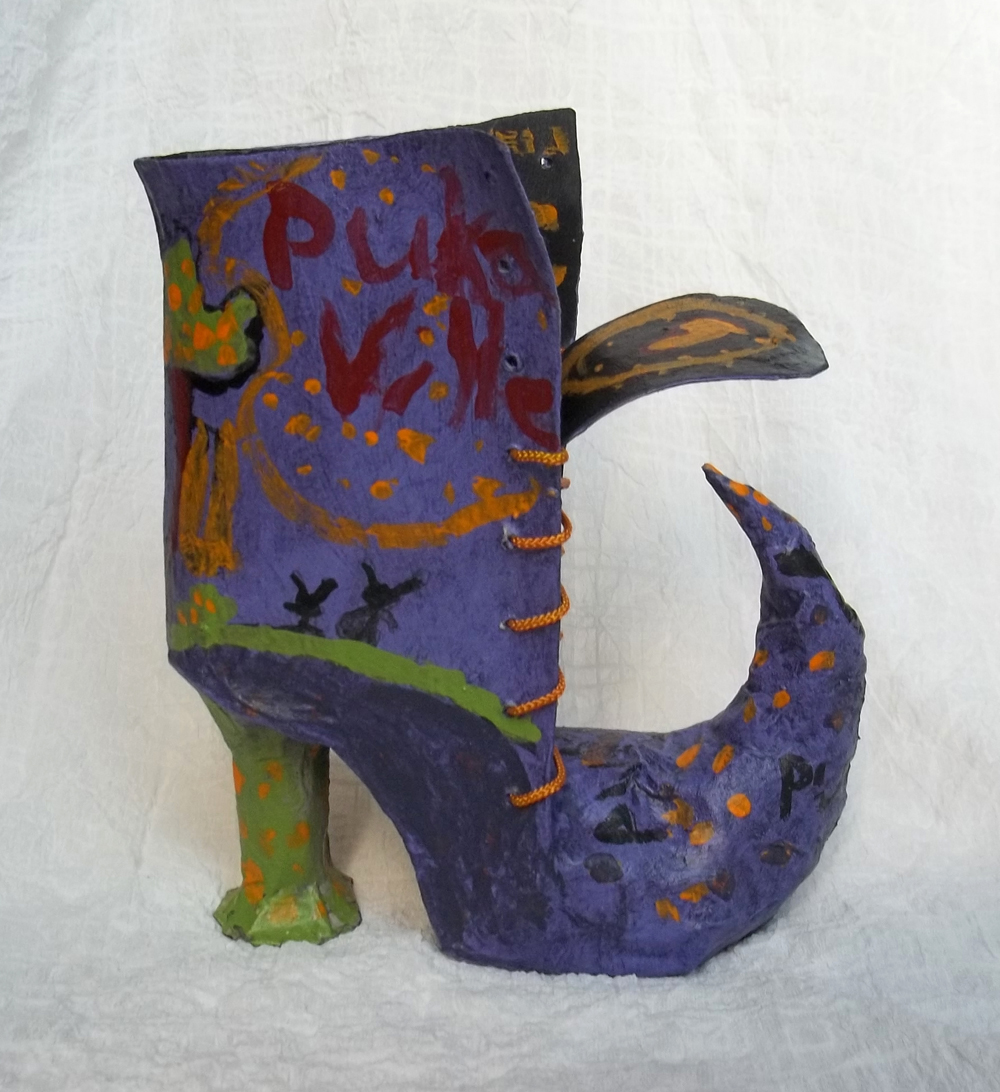
Just one more shoe from the set to finish.  It's the super tall one.  I probably won't have it finished for this Halloween, though.  But, the 9 year-old daughter also painted her first boot!  :) 


She helped us assemble a batch of the small boots, so I let her have one to paint however she wanted.  She was glad to shred paper strips and mix our paste, but I couldn't convince her to get her hands dirty sculpting.  Said she didn't like the feel of it.  Such a girly girl.  :)


And just so ya know, it says "Puka Ville", not "Puke Ville".  Tee hee.  She meant to write "pooka".  Those are little bunny-like pookas playing atop the heel.  The other side has some houses. I think it's going to be fun pulling this out when she's older. I should let her paint one each year. :)
 

These might be the last new witch shoes/boot you see for us this Halloween.  I may keep working on a larger boot, but I've got a lot on my plate right now.  Until next post, be craft-tastic!

Saturday, August 25, 2012

Miss Witch's Ogrehide Witch BOO't available in time for Halloween


Miss Witch's Ogrehide Boots

Miss Witch met an ogre named Clyde,
who quite unexpectedly died.
He was useless in life.
Always caused others strife.
But, his hide made fine boots when dried.

Miss Witch then went for a ride
in her new boots of green ogrehide.
She blushed top to bottom
when asked where she got'em.
"Off an ogre named Clyde", she replied.

by mieljolie, ©2012


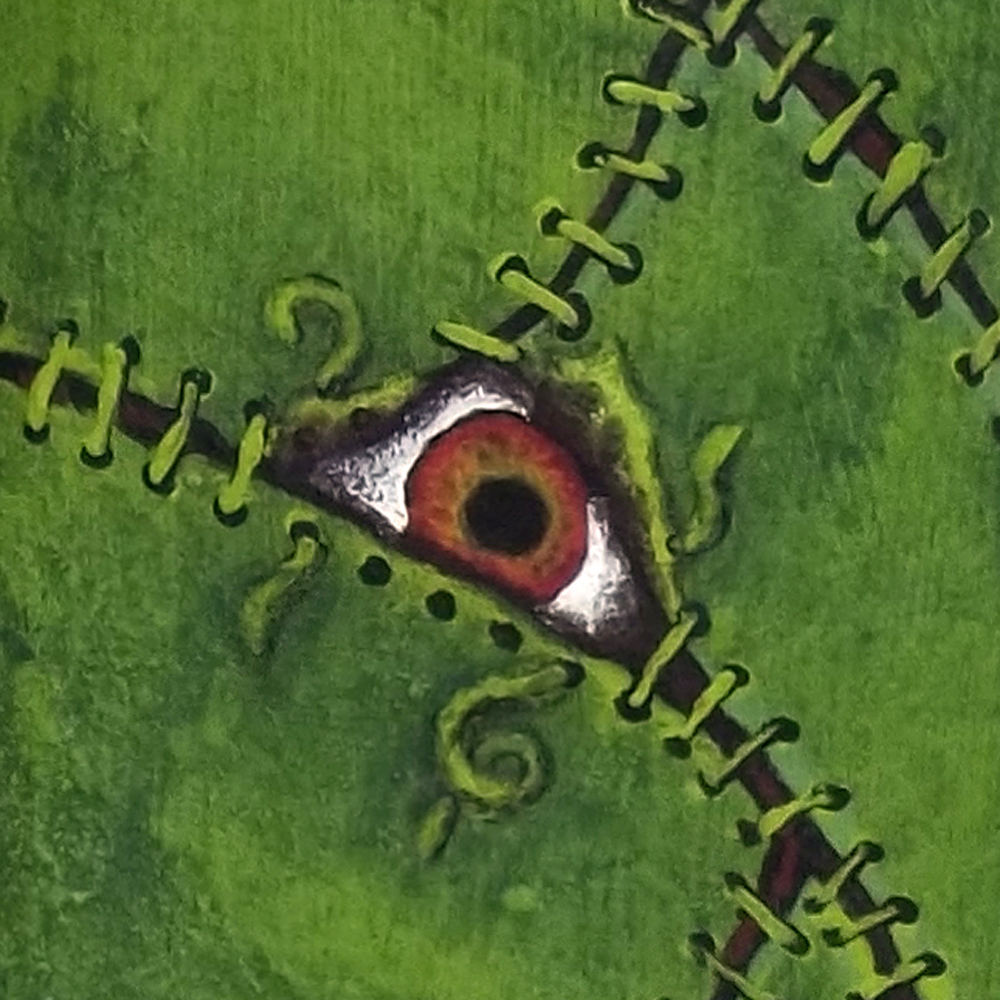
New Witch BOO't finished and available on Etsy!  This is a small sized one standing about 8" tall and 7.5" long and is painted to look like an ogre's hide all stitched up into a boot.  It has an eye peeking out on one side and a colorful spider on the other with a few flies landing everywhere on the sides and tongue. 


There are two more flies on the tongue in front.  I used a brown nylon cord for the lace. I had thought about using a color that would match the bright green stitches, but decided the brown would tie in the tree stump heel better.


Close up detail of the spider and a fly on the left side and of the eye on the right side. (Click images to see larger versions)  I think I've been inspired a lot by the many spiders we seem to be finding around our house these days.  We've seen orb weavers, wolf spiders, cob web or house spiders, and our family favorites the many colors of jumping spider, among others.  Jumping spiders are the only ones we allow to stay inside.  The are fairly harmless, secluded, and territorial.  So, they keep all the other creepy crawlies at bay. The rest get cupped up and sent back out to the "wild".


It was rather relaxing (and just a wee bit tedious) painting all the stitches.  I may revisit this theme again in the future.  But perhaps in a more deliberate symetrical fashion or just on portions of a boot. 


I'll be trying to finish up some larger BOO'ts next along with some costuming.  One boot may have a haunted house theme.  Hope to have at least one more completed by Halloween.  **Knocks on ogre-hide boot's faux wood heel**  ;)

Thursday, August 23, 2012

Free Felt Bat Pattern for Halloween


Sure wishing the weather would start cooling off here.  I'm so ready for fall and Halloween to get here.  Oh, but wait!  Then I'd have to have all these projects done!  Nevermind.  :) 

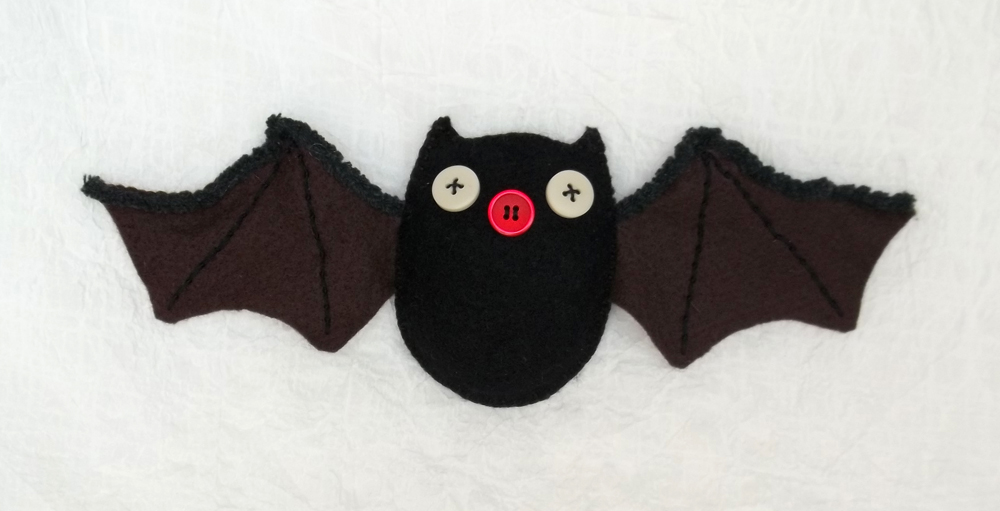
While the daughter was busy sewing her felt/polar fleece stuffies this summer, I sat down with her a few times to create this bat for her. 


He's about 10" wide and 3.5" tall and made with mostly felt scrap, a piece of chenille stem and some buttons. The chenille stem makes the wings slightly posable.  I have to say that, though I enjoyed myself, handsewing the entire thing has really made me appreciate my sewing machine.


If you'd like to make one of these, I've put together a free pattern with some brief instructions on Craftsy.com:


http://www.craftsy.com/pattern/sewing/toy/felt-button-bat/160384 - I'd really love to hear if you give it a try!

BTW, while I was making my bat, the daughter tried her hand at a baby bat, too. :)  Isn't it adorable?! It's pretty small at only 4" in length.  She gave it to me and it is now sitting on my computer speaker until I find it a better spot.  She's still at the stuffy making frenzie.  I'll post some more of her work, soon.


Hope you're having a crafty time!