Showing posts with label sewing. Show all posts

Friday, July 7, 2017

Crafting Update - Yes, I'm still alive!

It's been a while since I've posted some of my crafts on here.  Been busy working on new things, just finding it difficult to get pics and share them before we are off creating something else.  It really has been easier to just share WIP pics on Facebook.  THough I may contininue to post the WIP's on Facebook, I do plan to still share more elaborate posts and tutorials here.  They don't get lost as easily.

Most of what you will see on our craft tables is Harry Potter related at the moment.  (Sorry to those here for other crafting.  I will get back to other things, eventually.)  Been helping my mom make her magical creatures and also decorations for our annual parties.  Here are a few things we've been working on that I will hopefully be elaborating on more in later posts:

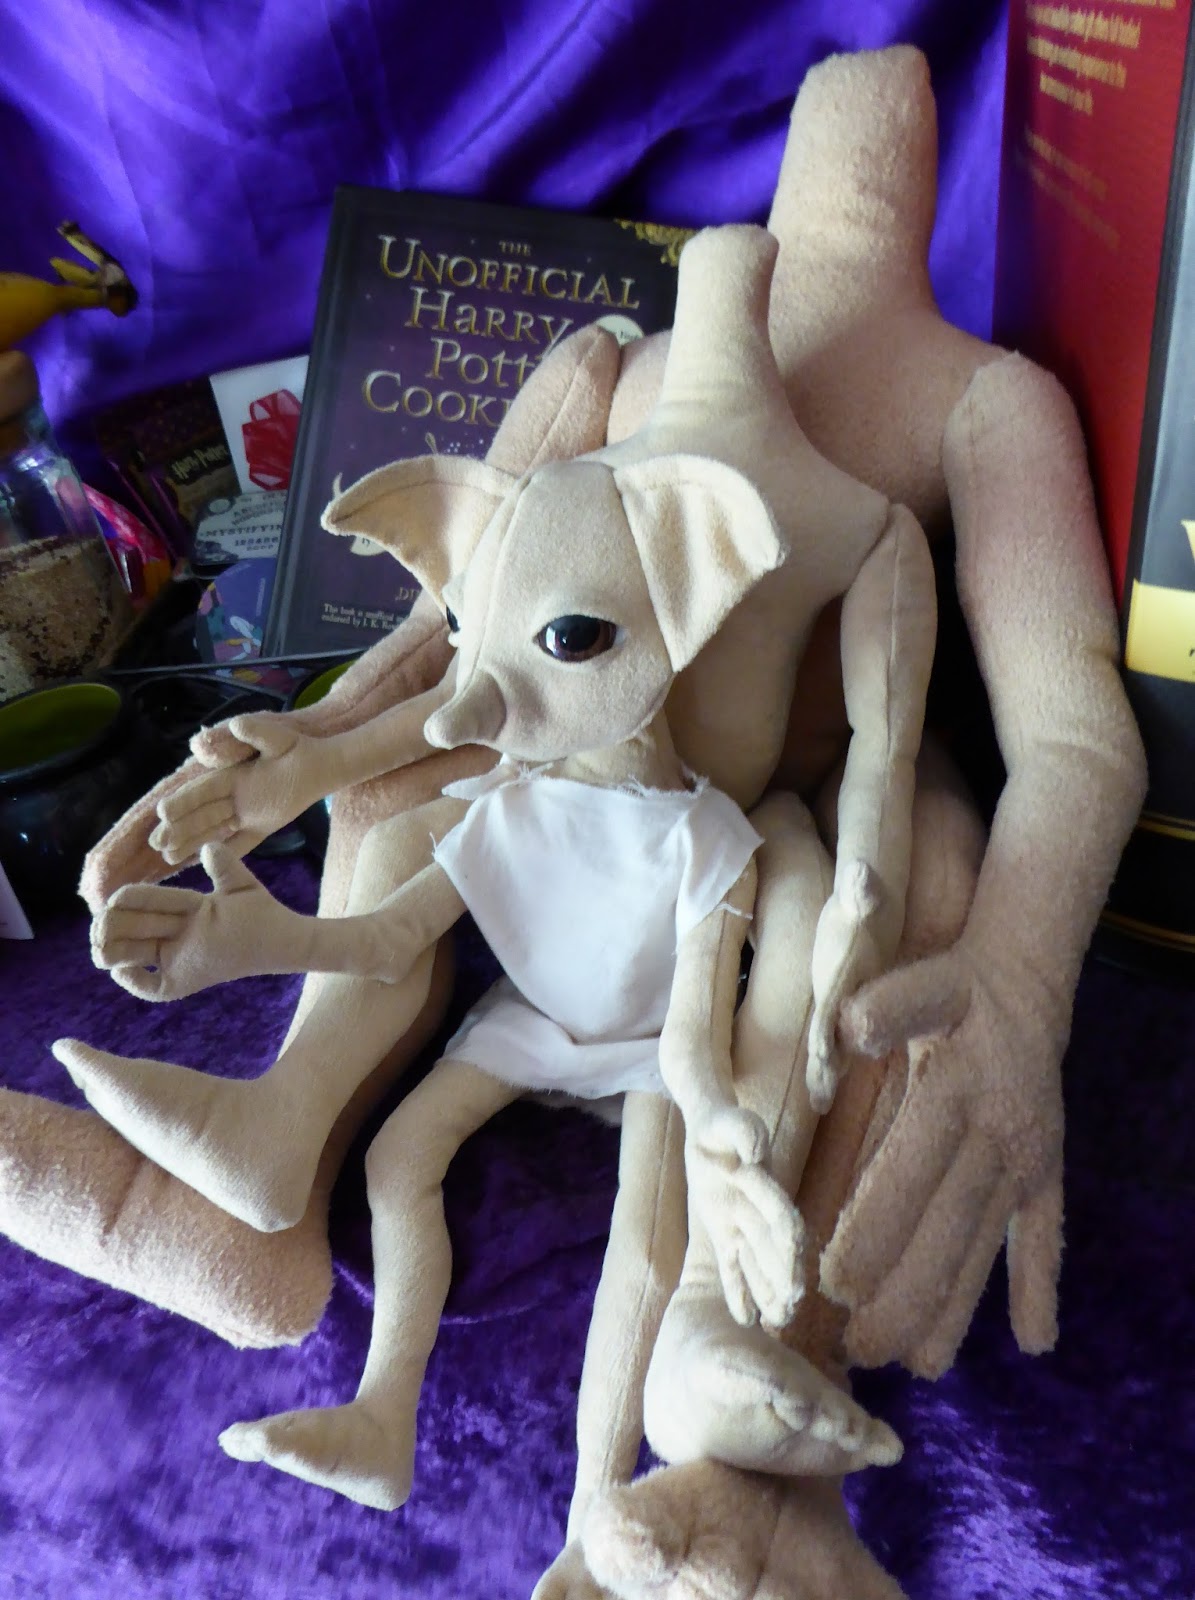
Improved Kreacher House Elf


We've been making improvements to the houses elves, especially Kreacher.  Really liking the expression we can get from them.  :)  We are currently working on custom eyes for them.  It is so hard to find the right eye and they can be crazy expensive. (like $20 a pair!)  The tutorial that I've been promising for so long is still just nearly finished.  The eyes, and face in general, are what is keeping it from being available.  I hate to share it and then change what we do.  This not only confuses user, it makes it frustrating for me to have to keep track of the versions. But, when we are satisfied with them, we will be sharing our techniques.


Fantastic Beast Planner/Journal/Coloring Book...and other items


This was a huge undertaking for a craft swap.  I decided to try it because my mom and sis also wanted one to use.  It was a lot of fun researching planner.  I still would like to make some changes and add more things.  We are thinking of making an HP themed one, too.  I'm sharing the pages I created for those who would like them.  Just ask.  I will add a link to the post coming up.

Various Papercrafts


Like the MACUSA Wand Permit bookmark included in the pic of the FB Journal Swap, I've been making some random printed props.  Improved our Chocolate Frog box and Wizard Card Template as well as redesigning the bottom of our Bertie Box and a new Eyelops Owl Treat box for our tiny macrame Hedwigs.  These are great for our parties as well as to add to swaps and along with purchases of our creatures.  We never know what little extra tidbit we will throw in on a whim.  :)

Future plans include more magical creatures.  First up will most likely be a Murtlap and a revisit on our Doxies to look more like the FB movie version.  Somewhere in there I will also be trying to make new costuming for faire and add some new improvements to our Yurt.  Wish me time and luck!  :)

Friday, February 3, 2017

Pixie Kits Are Available Again...and with Fabric Choices!

With the positive response we've had to the Pixie Kits, we've decided to add options for different fabric choices!


Recently we had some difficulty locating our preferred fabric, Alova Suede Cloth, in the proper colors for pixies.  Our supply got so low we ended up having to take down our kit listing to keep enough in stock for orders.  But alas, I have good news!  We managed to locate a new source.  And, with all the different fabrics we've been experimenting with as alternatives, we thought we would offer up some of our favorites to you.

We really like how adorable these guys look in Minky Cuddle.  It's a super soft and fuzzy fabric that comes in many colors that is pretty easy to sew with.  Kids will love to hug and squeeze stuffed creatures made from this stuff.  It can be a bit pricey for the Shannon brand compared to others and cheaper options like polar fleece, but it is worth the extra cost.  It will hold its shape better then fleece.  We are still searching for a slightly darker blue between the two pictured here.

We also tried a few other types of suede cloth with varying results.  There are so many types of suede cloth out there.  Be sure you are getting one that is fairly sturdy and doesn't fray.  We also tried a knit velour.  We really like this fabrics very subtle stretch.  It holds its shape well and keeps the legs and arms slim on the pixies, while still not wrinkling around curves.  However, it is a little frustrating to sew with.  It has a tendency to crawl a bit.  We also weren't as thrilled with it's faded blue color.  Hoping to find this in a slightly brighter blue.

Would love to hear what you think of the new color combos.  Still having delays on the House Elf Tutorial.  Thank you all for the patience.

Tuesday, January 17, 2017

More Magical Creatures Inspired by Fantastic Beasts and Where to Find Them

Since the Fantastic Beasts movie and our 4th year party, my mom and I have been working on a bunch of new Harry Potter creatures including nifflers, bowtruckles and grindylows.  If you've been following my facebook craft page (https://www.facebook.com/crafty.mieljolie/), you may have seen a few of these.


Here is the latest bendy posable Pickett the Bowtruckle and a test Niffler.  Still working on a 2nd attempt at a Grindylow.  We found a neat fabric for him.  Just waiting for mom to sew the head and arms on.  But, we've really been enjoying making a new simpler kid friendlier version of our house elves and pixies.


Mom has been wanting to make an attempt a knee hugging "house elf on a shelf" dolls for quite a while now.  So, this past holiday we finally made one.  He turned out so cute, we are planning to offer them in our Etsy store year round, soon.


We are calling them Teacup House Elves due to this photoshoot we did with one.


They are much smaller and simpler in construction and stand a mere 10" compared to the 14-18" jointed elves.


We were having fun and tried a Winky and Kreacher, too.


We got to thinking this might be a good kid option for pixies, too.  We're calling these Pocket Pixies because they are smaller than the jointed or mobile ones.  (Even managed to alter the removable wings to attach with velcro instead of pinbacks.)


Then, to test her improving skills, mom had to try to make them as small as possible!


And, man were they tiny.  As frustrating as they were, I don't think she will make these again anytime soon, but it is adorable.  :)


At less than 4" tall, it is the smallest doll we have successfully attempted.  She may try another small two-toned jointed one later.

That's it for this post.  Hope to have many more new crafts the next go round.  Until then, keep on being crafty!

Monday, September 26, 2016

Monk Robe Pattern with Hooded Cowl


This robe was a quick project we came up with after finding some great knitted fabric on clearance.  We thought we'd do something different for first weekend of the Texas Renaissance Festival this year.  So, we're hosting a Monty Python Invasion.  (I'm amazed how the interest in our event took off!  Already have 80+ people listed as going and many more interested! ) Should be a blast.  You can join our event here:

https://www.facebook.com/events/1641099259548673

If anyone is interested in making these quick and easy robes, here is the pattern layout I used:


The robes took a total of 105" of 60-inch wide fabric.  I set it up so that we could take advantage of the unique ratty looking selvage edges to avoid having to hem.  If you're unsure how it goes together, feel free to ask questions in the comments.


Also working on a prototype for our fake wooden planks.  They're made of layers of corrugated cardboard.  Still need to be painted, but I made them open up to a silly walk sign inside.


We also put together some reversible silly walk signs made with knights that we will have posted around camp.  I designed the sign in Adobe Illustrator before printing on cardstock and affixing them to paintsticks with staples and spray adhesive. (If you'd like the digital files to print your own, just message me.)

Still hoping to get some knight's surcoats made, too.  Wish me luck and time!  :)

Wednesday, August 31, 2016

House Elves and Pixies are Available

Just listed a couple of smaller house elves and some more pixies.  Here is the listing for the elves:
https://www.etsy.com/listing/462440268/plush-jointed-house-elf-inspired-by-the


We've been finalizing the house elf tutorial.  Now that the head/face are pretty much settled on, I just need to get some better pics of the construction process.


The one is being dubbed "Morty".


And this one is "Wally". They are both the smaller 13-14" tall.


And, the new set of plusher pixies.  These are much safer for kids.  The arms and legs are sewn in.  So happy to have found the plush pixie fabric again.  My sis found it in Kansas.  Our stores do not seem to sell it, and I can't find it online, either.  :/


That's it for now.  The tutorial should be available soon!  (I really do mean this.  I seem to say this, and then something will come up to delay things.  But I am honestly trying my hardest to get it ready.)

Tuesday, August 2, 2016

More House Elf Progress


Took this guy to the Midnight Release Party for "Harry Potter and the Cursed Child" Book.  He's the latest house elf finished after all the pattern alterations I've been playing with.  We've been calling him "Gummy" due to his toothless grin.  I'm so sad that I already finished reading the book in only two sittings.  It went way too fast.


This is Gummy before fixing his mouth into a smile.  If you've been following me on Facebook, you've probably seen me posting quick progress pics to get opinions as I attempt to perfect the heads.  I'm pretty happy with the bodies.  The shoulders are a little broad, but this is due to changing from the button joints to doll joints.  Without the thread running between them, there is no tension holding them together.  I may reduce this at a later date.  Especially if we make another Kreacher with his slumped posture.


This is a before/after shot of the shoulders, ears, eye, and head shape changes.  I'm really pleased with the new ear shape and placement.  But, I've really been struggling with those eyes. I'll show that more in just a bit.  I think the top of the head could be a wee bit wider, but I'm not going to fuss with that this go round.


I was having a lot of difficulty getting the elves to not be either grumpy or sad looking.  I thought it was mostly because of the eyes, but with the help from someone's helpful suggestions in a Harry Potter group, I've discovered I can make their expressions more happy and less mad/sad by creating tension in the cheeks.  The image above is Gummy before and after running thread from his outer eye corners to the corners of his mouth.  So happy!  And, I am too!  :)


The eyes are really bugging me.  At first, we went back and forth with using just plain doll eyes with no lids.  But, this makes the elves look spaced out like the two on top in the pic above.  I did find a way to line the back of the eyes to create eyelids.  I like this, but it's just not right just yet. And, I'm just not happy with eyes with no scleras (white parts) and huge pupils.


So, I tried painting some ping pong balls just to see what it would look like.  I really think it looks more like Dobby, but still a bit creepy.


The above image is of the same elf head (with over-sized eye sockets) with different eyes.  I've been trying different sizes as well as different materials.  Besides looking weird, it is sometimes difficult to find the safety doll eyes large enough for the elves at the larger sizes.  And, they can cost a good deal more when I do find them.  I was also hoping to find materials anyone can find locally for the tutorial.   At first I tried painting and got the iris too big and the pupil too small.  The last two sets in the pic above show a new solution that is promising.  It's a ping pong ball with the safety doll eye poked into a hole in the ball.  The green iris is smaller and centered, and looks scared.  The larger brown eye is off centered and can be rotated for different expressions.  These are great because they are less work, and have the safety back to secure them.  However, the down fall of these is that the eyelid gets caught behind the iris.  Perhaps I need to find a way to glue the iris to the sclera with no ridge between.  I'm also looking into resin as an option t cast my own eyes from scratch.  I'm also wanting to try to transfer printed irises to the white plastic ball.  But, I really need the safety back to secure the eyes in, so they can't be popped out easily.

That's where I am, so far.  I'm hoping to get this figured out so I can wrap up the tutorial. with the best options.  Wish me luck, again!

Friday, July 15, 2016

House Elf Head Progress


Been busy working on the House Elf tutorial.  I've got the body portion pretty much finished.  But, as the pics show, we're making some changes to the heads at this point.  I'll need to wait for the pattern changes to be settled on before I can get the pictures in place. 


So far I've gone back and forth on the size of the eyes, changed the shape of the ears a few times, and played with the angle of the nose/forehead a bit.  Still debating to move the eyes closer together and curve the ears even more.  I would also like to make my own eyes.  These have no whites around them and the pupils are too large.  I think I may have figured out a solution using resin, but I still need to get the supplies to try it.  I think I may wait until after the tutorial is finished using these, since they are less work (though somewhat hard to find).


We are amassing quite a few heads, so we thought we'd use some of the less successful ones to make plaques like the Black family house had on the walls.  :)  I'll share our results on that when I'm finished with them.  In the meantime the tutorial should be available within a month or two, I hope.


Oh!  Btw, here are three body sizes that we've tried so far:  A small 12", a medium 18", and a large 24" (The large is made with a thicker furry-ish fabric.  They will also have heads, soon.  :)

Wednesday, April 27, 2016

Gnome Tutorial is finished and available on Etsy!


Gnome tutorial is finished!  You can find it here:  https://www.etsy.com/listing/291683093/how-to-make-garden-gnomes-pdf-tutorial

It contains step by step instructions for making our garden gnomes inspired by the Harry Potter series.  We used the Chamber of Secrets and Fantastic Beasts references as well as the Pottermore website and video games.


The Tools and Supplies list looks daunting, but I tried to describe each item so they would be easier to find.


There are options to make them into bean bags or plain dolls.  And, they can be made with or without eyes.


Hope you like the tutorial.  If you try it, I would love to know how it goes!

NOTE:  If anyone has interest in a kit including all fabric/supplies for one of my tutorials, please message me. I'm curious if this would be of use to anyone, especially in doll making. I can buy eyes/joints in bulk that could save you money and time hunting down supplies. I also have surplus supplies for my other crafting projects.

Monday, December 7, 2015

Doxies!!

Another new magical creature to add to the magical menagerie.


These are doxies, or at least our interpretation of what one should look like, since they haven't made an appearance in the Harry Potter movies, yet.  They are described in "Fantastic Beast & Where to Find Them" as:

"...often mistaken for a fairy though it is a quite separate species.  Like the fairy, it has a minute human form, though in the Doxy's case this is covered in thick black hair and has an extra pair of arms and legs.  The Doxy's wings are thick, curved, and shiny, much like a beetle's..."


We made two attempts so far.  The first is more human-like in the face.  With the 2nd one we played on the Doxy name, which is what dachshund dogs have been nicknamed.  The more dog-headed version is our favorite.  We think it is the cutest.


They are about 7" tall with four arms and four legs.  This is smaller than the pixies, which made it really tough to get all those arms and legs to fit on!


The wings are cut from plastic root beer bottle painted underneath with nail polish.  I want to add another transparent set of wings under these in the future.  We've since found some hairier fabric we want to try, too.  So, you may see a new attempt at these at some point.  Not sure how that will go at this size, but we'll give it a try.


These are based off of a fairy pattern we've been working on.   I'll post the tiny fairies once we finish some details and maybe put some clothes on them.

Tuesday, December 1, 2015

Cornish Pixie Tutorial is Available


Just listed the tutorial/pattern for the Cornish Pixies.  Whew!  It's a long one!  I didn't realize how much my mom and I put into these little guys!  But, I wanted to offer this to those who have expressed the desire to make their own.  The instruction include everything we do on ours, and all the things we have learned in the process.


At 22 pages long, I'm still kinda leery of how complicated it might seem with all the steps.  I'll admit it is a lot to remember.  I'm thinking of offering a simplified version without joints, wired antennae, etc...at some point if necessary.  So, I'd really like to hear how those who try the pattern and tutorial find it to be at different skill levels.


The supply list is even pretty long because I included explanations on each item, and a good portion of it is optional.


I've started a tutorial for gnomes.  I don't think it will be near as long with their simpler construction.  Also plan to work on one for the house elves, but we are still working on a few changes to the pattern.  One of these changes is the size.  We want to work out a life-sized version.  We're up to an 18" one at this point.  I hope to post about him in the near future.  Got a few other projects to post before then.

NOTE:  If anyone has interest in a kit including all fabric/supplies for one of my tutorials, please message me. I'm curious if this would be of use to anyone, especially in doll making. I can buy eyes/joints in bulk that could save you money and time hunting down supplies. I also have surplus supplies for my other crafting projects.