

Thursday, January 21, 2010

Swish! Spin! Spin! Weeee! - Reconstructing Tiered Skirts

I've had to pause all the craziness in my life recently to treat myself to my own birthday gift. Happy Birthday to me!!

Over the past couple of years I have purchased a PILE of skirts, which were mostly broomstick and other long ones, from various thrift stores. But, I'm always disappointed in the fullness or length of these skirts. If you haven't read previously, I'm attempting tribal-style bellydancing. And, I love the floor-length flowing skirts that traditional ATS dancers wear. So, I decided to reconstruct a couple of my shorter cotton skirts in to one fuller dance skirt.
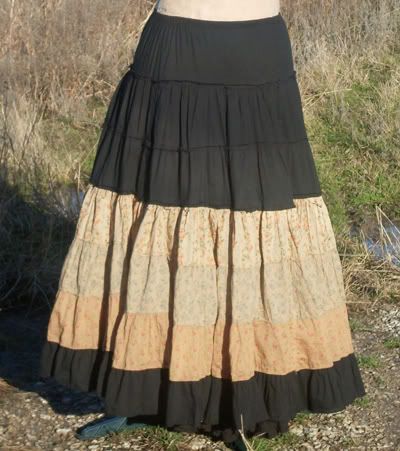
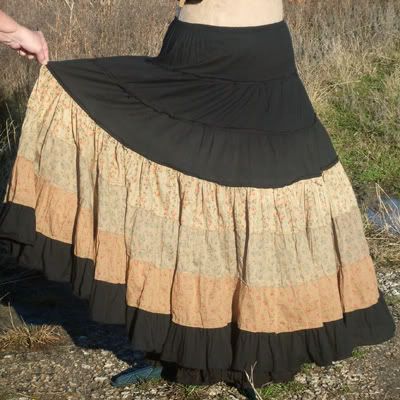


I started by taking apart a tan printed skirt between the middle tiers that repeated and sewed them together into one long piece. Then, I sewed that to the third tier of an all black skirt. The leftover fabric tiers I removed from the black skirt were then sewn together and added to the bottom. It worked quite nicely. And, this way I could minimize the sewing and take advantage of the existing waistband. It was convenient that all the tiers were about the same width. The only complaint I had with my new skirt was the tightness of the top tiers. But, once I tried it on, I like that it is not bulky at the waist with excess gathers. I can add scarves, belts and other accessories to build up my hips.

In all, it took me two days from start to finish for this skirt. And, that is only because I took care to rip the seams carefully to conserve the width of fabric. This would be a great way to reuse those sentimental items that don't fit anymore. I frequently buy skirts and tops in excessively larger sizes and take in the waist and other areas. I'm an average size, and it seems all the good stuff that would fit me are always taken. :)

I would like to add some faux shisha mirrors and other embellishments to this skirt, later. Hope that won't weigh it down too much. It's a nice weight at the moment and flows beautifully.

I have future plans to make a choli top out of the bottom edge of yet another skirt:
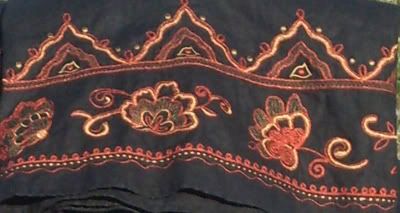


I just loved the embroidery on this one. Should be ample there to make the top, which I'm going to create off of an existing top I own that fits me. I may try to line it with the leftover linen fabric from the top portion, but it may be too thick to be comfortable doing that.

***UPDATE 03/30/10***

Just adding an action pic we took while I was playing around with accessories.


Happy crafting!

Monday, November 9, 2009

Image Viewing Problem

Yikes! Bandwidth Exceeded!

You may have noticed some of my images aren't showing up these days. I just wanted to let everyone know that this is a temporary problem. Should be back to normal around the 18th of this month. I was using Photobucket.com to host my images, and it seems they only allow a limited amount of traffic every month for non pro accounts. If this happens again, I will move the images to a new host. Or, I may have to consider taking up donations to open a pro account in the future.

Sorry for the inconvenience.

Mieljolie

Monday, November 2, 2009

Braided Hair Falls with Instructions

I've been wanting to make myself some of these hair falls ever since last years Harry Potter swap when I made syntheytic dreads for my swap partner. Finally managed to make enough to wear with my outfit! I was still braiding them in the car on the way there!

kristen_n_me

I made these hair falls out of acrylic yarn using mostly regular braiding and twist braiding made with black Lion Brand's Homespun and a little Parfait colored Boucle. I think the hair falls were fun and really make the outfit. They did get a LOT of attention. Since they were only safety pinned on, I also gave a few away as... well... favors, I guess. :)

Now, if you want to try some of these braids, yourself, you'll need LOTS of yarn (and time) and a pair of scissors. I found a wonderful indepth tutorial here for making acrylic dreads. This is what I based mine on, but I didn't spend the extra time unraveling, combing, and boiling the yarn for these. However, even though the initial construction is the same, her dreads will probably hold up longer, especially if you take the extra time to glue soak them. Besides, braided falls tend to be a great deal heavier than the matted dreads.
  • I cut two pieces of yarn about 2 and a half times the length you want the finished fall to be.
  • Then, cut a third piece about a hands length (finger tip to wrist) longer. This longer piece is used to tie the strand together and form the loop on top to hang it from.
  • I start by folding the three strands in half over my hand and pulling the longest one even with the other strands on one end so that the tail hangs down on just one side. Find the middle and align them just an inch and a half to two inches off with the tail end being longer.
  • Separate the long tail strand from the rest up to the middle point. Start tying knots with just the long tail over the other strands. I made about 10 alternated pairs of half knots to prevent the twisting effect.
  • Once the knots are finished, I tied the two ends of the long strand together in a square (double) knot to form the loop.
  • Then, using a small safety pin attach this to something sturdy to start braiding. You'll want to start out very loose and get tighter with the braiding toward the tip. You really need to braid loosely. I tighten up the braiding for the last few inches just to give it a more tapering look.
To add the color, before braiding cut one or two lengths of your contrasting yarn depending on it's thickness and poke it through the top loop you created matching up the ends. Now you can divide up the strands and braid it as normal.

I wrapped my ends with another thinner string. Embroidery floss or that thin crochet yarn would work. You'll need anywhere from 1 to 2 yards. You can fold the ends of the braid over for a clean blunt tip or leave them hanging for a pom pom or tassel like end.
  • I fold the string beside the braid forming a loop near the tip end of the braid. Starting back to toward the middle, wrap over the string and braid tightly toward the end leaving a tail of a few inches exposed.
  • Once the wrap is the length you want, poke the wrapping end of string through the string loop and pull the other end you wrapped over. This should pull the loop into the wrap hiding it. Don't pull too hard. You don't want the end to come out the other side. If it does, just pull it back the other way using the other end.
  • Next, I give both ends of the string a good pull at the same time to tighten any slack.
  • Finally, just trim the ends off and you're done.
You can also add all kinds of doodads to your braids using jump rings or clasps. Or, just sew beads and things right on to them with thread.

If your braids start to look fuzzy from wearing, you can try boiling them to shrink the fuzz back into the braid. Just note that the braid will get shorter and tighter, as well. The tute link above suggests soaking them in a glue/water mixture to prevent them from getting fuzzy.

I'll try to get some pics up to illustrate the process if anyone is interested. I'm planning to make some piratey dreads for my mom's pirate outfit.

BTW, I'm pictured with Kristen whom I met at the McLotofus camp. She sewed her own garb including that beautiful bodice! Isn't it lovely! My pics always throw off the colors, its actually a bit greener than the blouse making it look perfect with her peacock earrings and necklace.