
Tuesday, June 19, 2018

Muggle Magic Swap Unboxing


I've been following an amazing youtube channel called Muggle Magic hosted by Danny.  He shares Harry Potter themed tutorials/DIY's mainly focused on replica papercrafts, though he has shared other projects as well.  The best part is he shares most of his stunning files for all to print and enjoy!  (WB has restricted his sharing, but he still has some alterable files and does regular give-a-ways of what he makes.)

I found I just had to contacted him to inquire about doing a craft swap with my mom and I, and...I just received my box from him!  Prepare to be amazed! (Sorry, it's a bit pic heavy.)


The project that really struck me was his version of the Weasleys' Wizard Wheezes Playing Cards.  His attention to detail on this deck showed not only his love of Rowling's magical world, but also his knowledge of muggle card tricks and of proper poker decks construction.  :)  (I have found memories of  my granddad teaching me a couple card tricks when I was young, so I appreciate the art.)  His version of the deck not only fixed many of the mistakes made in the licensed version, but even included optional trick cards, which is something the Weasley Twins would of course had to have in theirs.  He does a side-by-side comparison, if you want to see all the ways that the licensed version was goofed up.  Then, Danny went and had his version professionally printed!   I have collected card decks for years, and this one is my absolute favorite now.  The deck shown here is the professional version we received in the swap.


Also included was a colorful copy of the replica Weasleys' Wizard Wheezes Product Catalog.  Here is a pic of the cover and another inside page spread.  I believe there are 12 pages including the covers.  You can see the rest at his channel.


Here is a close up of the details.  Believe me, they look even better in person!


Another simple astounding project he shared was a full-size replica Marauder's Map!  THis is a huge undertaking!  This one is also more accurate to the movie version, than the licensed Noble version which also seem to have minor errors.  Frankly, this is the best version I have seen.  He also did a mod of the Noble version to fix some of the issues and add to it.


I really love Danny's alternate cover hidden behind the other.  This 2nd image is what Snape saw when he tried to read the map.  Such a nice addition!  It also includes lots of flaps hiding footprints of some of the more prominent characters and even show them in appropriate locations.  He plans to add more features in the future, like pop-up staircases, etc...


If that wasn't enough for our swap box, he also included a fully readable Quibbler!  The illustrations in this are amazing!  So much to look at!  You should definitely go check it out!


Even includes the Spectre Specs inside.  :)  Though, for display I may replace the glasses included with the modded version I created with ChromaDepth lenses.  Will be fun to see what the glasses do to the colorful images in there.  :)


Here is another surprise item we received.  A Borgin and Burkes Product Catalog with all the creepy items they have available for your Dark Arts needs.  :)  I still can't get over the detail in these items.  Again, you can see the full version on his channel.
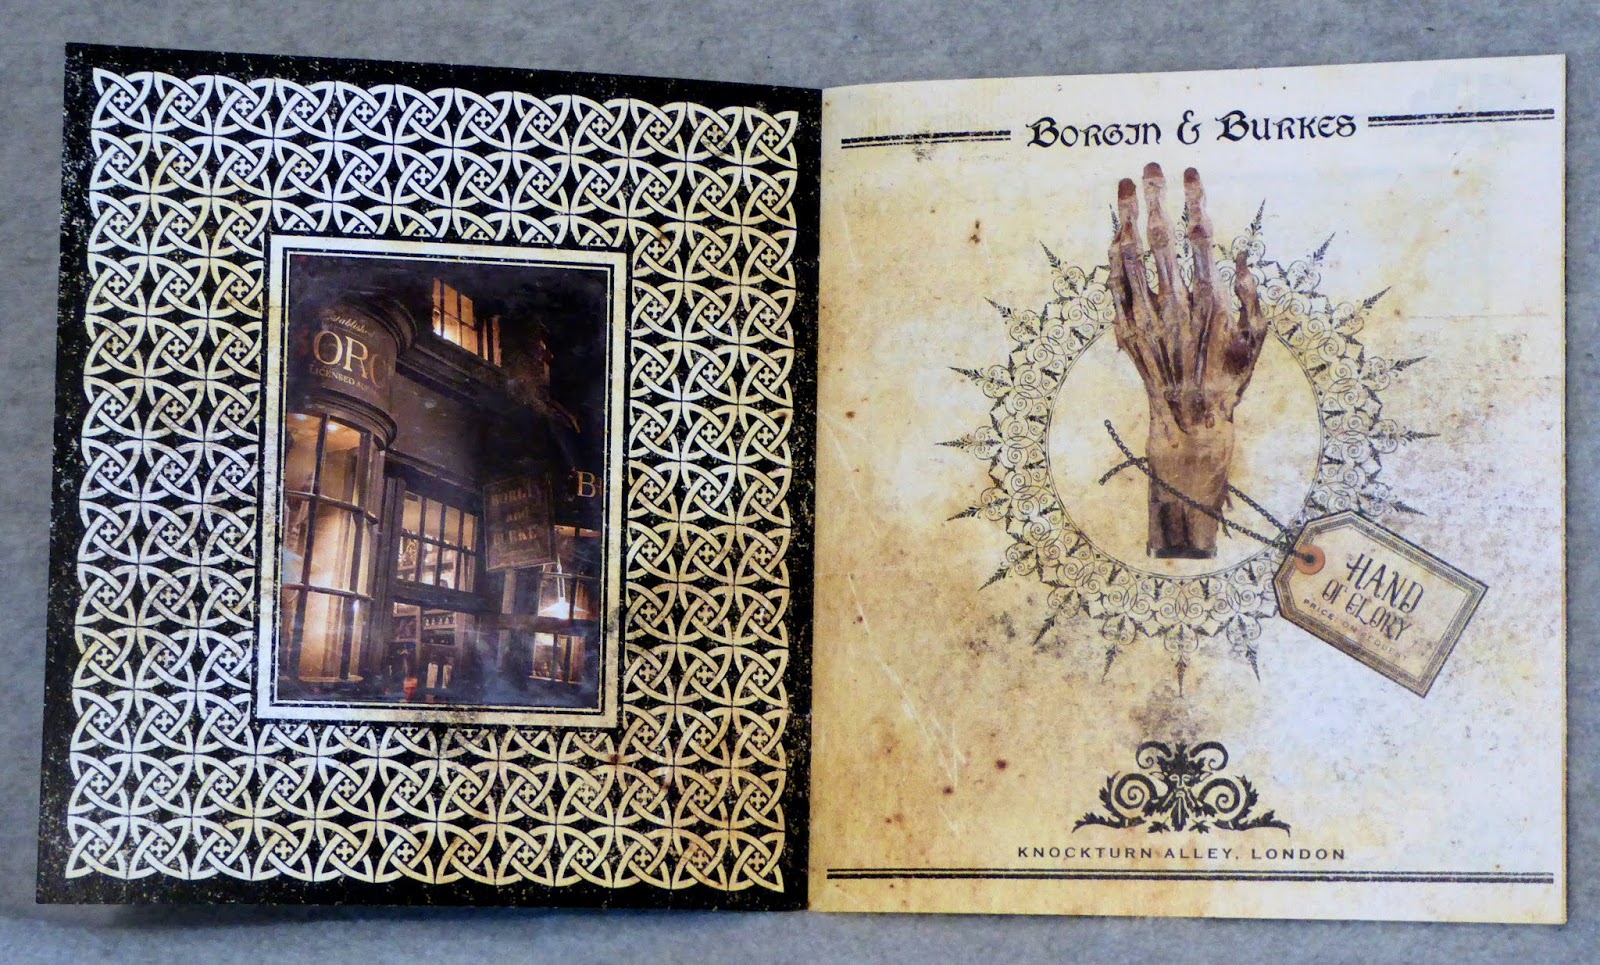


To me, the hand of glory has always been the most fascinating item in their shop.  Wonder how much one of those would set me back?  :)


And, being a Ravenclaw, I just adore this Hogwarts composition book alteration.  Just have to keep it away from the daughter and rest of our family!  LOL  (I borrowed the quill and bird from the daughter for the pic.)  :)


The book even includes replacement end sheets in front and back.  Better get my name in there quick before someone claims it!


Just when I though I had reached the end, I also found some smaller items like a SPEW flyer, Detention Notice for Harry, Time Table, and a teeny tiny Marauder's Map hidden in the book!  That Map!  It's so cute!!  :)

I'm so pleased with all of it.  I hope Danny is equally pleased with what we sent.  Can't wait to display everything proudly in our HP shelves!  We sent some plush house elves and a few bits and bobs. You can view the unboxing of what I sent to him on Youtube.  Or, you can check out his pics on Instagram.

Tuesday, June 12, 2018

Hogwart's Letter and Sealing Wax Recipe

For 6 years I have been meaning to revisit Hogwart's Acceptance Letters.  I wanted to improve on the old design I had created here.  It would involve making my own envelopes as well as improving my wax seal.

It's strange that the version of the letter MinaLima sells as a replica print is different than the one pictured in the film.  It is suppose to be handwritten script, which is even different from the writing in the book.  :/  I went with the MinaLima version, since it was easiest to replicate when they use mostly existing graphic elements for their work.  I found a free font online that someone had made, but it is a bit pixelated looking, and missing some characters, like the hyphen.  So I attempted to trace and replace the letters and add in the missing ones.  I was also able to find a decent picture of the envelope front and back to get the logo and some of the address letters from.  I will try to get some pics of the letter soon.

But, for now,  I wanted to share the envelope and sealing wax.


I found a recipe for making DIY sealing wax melting together crayons and hot glue.  That's it.  Just these two in the right quantities works great! I then use a little gold Rub n' Buff to highlight it.


So, I made myself a sealing station using some things I found 2nd hand.  Found an cast iron candle holder (I think).  The tea light sitting in it puts off just the right amount of heat to melt, but not overcook the wax in the pots.  The pots were something I already had, but never found a use for til now.  The seals themselves are made from polymer clay, for now.  I glued them to champagne corks with E-6000 to make it easier to hold.  It helps to rub with a little cooking oil or water before pressing in the wax, to prevent it from sticking.


I melted the wax/glue into pots and poured that into tiny molds to make small melts that measure about a teaspoon, which is more than enough to make a seal.  This makes it much easier to use than the stick I originally made using tin foil as a mold.  The stick tended to catch fire and fall on the paper, singeing it.  To seal an envelope, I remelt the wax melts in a spoon over the candle (takes about 2-4 minutes) and pour onto the envelope.  I can also dip small bottles into the jars to seal the bottles.  

This is such a great use for all the old broken crayons the daughter brings home at the end of the school year.  And also use up the large gluesticks I have accumulated, but don't have a gun for.

Tuesday, May 29, 2018

Plates, Proclamations and Prophecies - Fifth Year Harry Potter Party Decor

Sorry, I never posted pics of our 5th year Harry Potter party decor from back in Nov.  It was all about Umbridge, the Ministry of Magic and OWL's.  Among our many existing Hogwart's decorations, we made kitty plates!:


LOTS of kitty plates!  :D


Just took a little Mod Podging kitten images onto various 2nd cake plates we found for 25-50 cents each.


We had purchased the licensed ones but they were so tiny! And cheap plastic.  :/  The largest was barely bigger than a saucer:  So, we hung them on a door.


My mom and sis found this pink jar that we added a knob with a MoM logo to.  We also colored some sugar pink with food coloring.


We also had to have some of Umbridge's Educational Decree Proclamations on the walls.  The frames are made of lightweight foam board we picked up for $1 a sheet at a dollar store painted with Acrylic Craft Paint.  They were large sheets, so didn't take much.  Ran out of time for the locks and would like to have put the box behind them to set them away from the wall like in the movie.  (I made up a template for cutting these.  If you would like to make some, I'm happy to send it to you.  Just message me by email or on Facebook.)


One of my favorite easy projects was making the prophecy balls from he Ministry of Magic.  We used plastic ornaments, battery LED light and angel hair from old styrofoam ornaments we had.  The based were various things from metal candle stands to plastic bottle parts spray-painted black.  Looked really cool lit up on our mantle.  (We reused our MoM logo poster from 4th Triwizard Tournament behind them.)


For our OWL's, we made test papers (not pictured) for each class.  And we handed out Dark Arts Defence blank journals to our students.  (I figure blank is just as useful as what was probably in them to begin with.)  ;)  We just printed the covers and wrapped them around dollar store journals.


My sis made us some really cool extendable ears!  Love them!  Plan to make them a box for next years Weasleys' shop.  She also made us some neat proclamation ornaments for the tree.  (Not pictured)


Last and definitely least was our cake.  LOL  We kept putting it off to the last minute, so ended up having the kids help make it.  If you can't tell, we were going for Mimbulus Mimbletonia, Neville's plant.  Ran out of frosting.  Kids may have been eating it while working.  :/  We skewered cupcakes of different sizes onto wire and frosted.  :D  It may not look great, but kids enjoyed making and eating it.  It was rather fun just pulling off what you wanted.  :)

Friday, July 7, 2017

Crafting Update - Yes, I'm still alive!

It's been a while since I've posted some of my crafts on here.  Been busy working on new things, just finding it difficult to get pics and share them before we are off creating something else.  It really has been easier to just share WIP pics on Facebook.  THough I may contininue to post the WIP's on Facebook, I do plan to still share more elaborate posts and tutorials here.  They don't get lost as easily.

Most of what you will see on our craft tables is Harry Potter related at the moment.  (Sorry to those here for other crafting.  I will get back to other things, eventually.)  Been helping my mom make her magical creatures and also decorations for our annual parties.  Here are a few things we've been working on that I will hopefully be elaborating on more in later posts:

Improved Kreacher House Elf


We've been making improvements to the houses elves, especially Kreacher.  Really liking the expression we can get from them.  :)  We are currently working on custom eyes for them.  It is so hard to find the right eye and they can be crazy expensive. (like $20 a pair!)  The tutorial that I've been promising for so long is still just nearly finished.  The eyes, and face in general, are what is keeping it from being available.  I hate to share it and then change what we do.  This not only confuses user, it makes it frustrating for me to have to keep track of the versions. But, when we are satisfied with them, we will be sharing our techniques.


Fantastic Beast Planner/Journal/Coloring Book...and other items


This was a huge undertaking for a craft swap.  I decided to try it because my mom and sis also wanted one to use.  It was a lot of fun researching planner.  I still would like to make some changes and add more things.  We are thinking of making an HP themed one, too.  I'm sharing the pages I created for those who would like them.  Just ask.  I will add a link to the post coming up.

Various Papercrafts


Like the MACUSA Wand Permit bookmark included in the pic of the FB Journal Swap, I've been making some random printed props.  Improved our Chocolate Frog box and Wizard Card Template as well as redesigning the bottom of our Bertie Box and a new Eyelops Owl Treat box for our tiny macrame Hedwigs.  These are great for our parties as well as to add to swaps and along with purchases of our creatures.  We never know what little extra tidbit we will throw in on a whim.  :)

Future plans include more magical creatures.  First up will most likely be a Murtlap and a revisit on our Doxies to look more like the FB movie version.  Somewhere in there I will also be trying to make new costuming for faire and add some new improvements to our Yurt.  Wish me time and luck!  :)

Friday, February 3, 2017

Pixie Kits Are Available Again...and with Fabric Choices!

With the positive response we've had to the Pixie Kits, we've decided to add options for different fabric choices!


Recently we had some difficulty locating our preferred fabric, Alova Suede Cloth, in the proper colors for pixies.  Our supply got so low we ended up having to take down our kit listing to keep enough in stock for orders.  But alas, I have good news!  We managed to locate a new source.  And, with all the different fabrics we've been experimenting with as alternatives, we thought we would offer up some of our favorites to you.

We really like how adorable these guys look in Minky Cuddle.  It's a super soft and fuzzy fabric that comes in many colors that is pretty easy to sew with.  Kids will love to hug and squeeze stuffed creatures made from this stuff.  It can be a bit pricey for the Shannon brand compared to others and cheaper options like polar fleece, but it is worth the extra cost.  It will hold its shape better then fleece.  We are still searching for a slightly darker blue between the two pictured here.

We also tried a few other types of suede cloth with varying results.  There are so many types of suede cloth out there.  Be sure you are getting one that is fairly sturdy and doesn't fray.  We also tried a knit velour.  We really like this fabrics very subtle stretch.  It holds its shape well and keeps the legs and arms slim on the pixies, while still not wrinkling around curves.  However, it is a little frustrating to sew with.  It has a tendency to crawl a bit.  We also weren't as thrilled with it's faded blue color.  Hoping to find this in a slightly brighter blue.

Would love to hear what you think of the new color combos.  Still having delays on the House Elf Tutorial.  Thank you all for the patience.

Tuesday, January 17, 2017

More Magical Creatures Inspired by Fantastic Beasts and Where to Find Them

Since the Fantastic Beasts movie and our 4th year party, my mom and I have been working on a bunch of new Harry Potter creatures including nifflers, bowtruckles and grindylows.  If you've been following my facebook craft page (https://www.facebook.com/crafty.mieljolie/), you may have seen a few of these.


Here is the latest bendy posable Pickett the Bowtruckle and a test Niffler.  Still working on a 2nd attempt at a Grindylow.  We found a neat fabric for him.  Just waiting for mom to sew the head and arms on.  But, we've really been enjoying making a new simpler kid friendlier version of our house elves and pixies.


Mom has been wanting to make an attempt a knee hugging "house elf on a shelf" dolls for quite a while now.  So, this past holiday we finally made one.  He turned out so cute, we are planning to offer them in our Etsy store year round, soon.


We are calling them Teacup House Elves due to this photoshoot we did with one.


They are much smaller and simpler in construction and stand a mere 10" compared to the 14-18" jointed elves.


We were having fun and tried a Winky and Kreacher, too.


We got to thinking this might be a good kid option for pixies, too.  We're calling these Pocket Pixies because they are smaller than the jointed or mobile ones.  (Even managed to alter the removable wings to attach with velcro instead of pinbacks.)


Then, to test her improving skills, mom had to try to make them as small as possible!


And, man were they tiny.  As frustrating as they were, I don't think she will make these again anytime soon, but it is adorable.  :)


At less than 4" tall, it is the smallest doll we have successfully attempted.  She may try another small two-toned jointed one later.

That's it for this post.  Hope to have many more new crafts the next go round.  Until then, keep on being crafty!

Monday, November 21, 2016

Our Yule Ball - 4th Year Hogwart's Party


Had a FANTASTIC weekend!  Just wrapped up our 4th annual Harry Potter themed party.  We hosted a Yule Ball to celebrate two of our family members b-days.  Also got to go see the new "Fantastic Beasts and Where to Find Them" movie!  Thought I would give a quick preview of all the stuff we made and received at the party. My sis and her daughter overwhelmed us with some of their awe-inspiring creativity!!! (I'll probably post some more better pics when the dust settles.


As we have done for the past three years, we decorated the whole house Hogwart's style.  And, each year the theme and activities of the party match the corresponding book.  This year was all about the Tri-wizard cup, Yule Ball and Mad Eye Moody.  :)  We had a DADA earthworm fountain, foe-glass dark detector, goblet of fire for choosing champions, and much more!


We made a couple golden dragon eggs.  I used paper mache over an 8 inch tall plastic egg.  The top clasp is polymer clay.  I wanted to make it open, but found it to be too complicated for the time I had to make it.  But, I may go back and cut one of them open at a later date.


My mom and I also worked on our first attempt at a Grindylow.  He was a mixture of a couple of our patterns for the gnome head and the house elf's jointed arms.  The tentacles were a big challenge.  We plan to go back and make another slightly larger version with larger tentacles and head.


Since this was first and foremost a Yule Ball, we spent a great deal of time turning our Great Hall into silver dance hall with decorations and lighting.  :)  We taped silver wrapping paper to the walls and made faux ice castle sculptures out of plastic beverage containers and icicle lights.  We also had an extensive wizard rock and HP parody playlist for the evening.  (If you'd like to hear some of the songs:  https://www.youtube.com/playlist?list=PL5bioASvRaQqMoQGlhpkkf6ne3L2xv3ZL)

Since Harry receive b-day cakes from all his friends while Dudley was on a diet, we asked the guest to bring 3 cup cake each for a competition.  One for each birthday person and one for a "cake walk" or exchange where they could receive a different cake.  We had some really clever submissions.  (I will get the pics soon.)

One of the last tasks we planned was a "Pin the Nose on Voldemort" or "You Nose Who".  We had guests stick it to Voldemort by hanging two laminated Voldy Faces on the wall with a selection of noses to pin him with. (Will get pics.)


For the last task, I drew up a quick Ministry banner on brown paper for above our cemetery laden mantle.  (This awesome instant cemetery is the work of Crafterella.  I received it in a craft swap a few years ago, and I just love it.)

And, speaking of craft swap, we received the craziest, coolest, most amazing items from my sis and her daughter this year!


They made us a faux stain glass mermaid window like the one in the Prefects' Bathroom.  It is so cool!  They used Gallery Glass on a textured plexiglass.


And this amazing piece!  I'm still reeling from this one!  I've wanted the hog-headed pumpkin juice pitcher since I saw it in the first movie!  She did an unbelievable job on the head details!!  :O


She even had the time to make us a textbook cd box which is perfect for our growing Wizard Rock and Audiobook collections!  We were so spoiled this year!


My sis also made some Mad Eye Moody Eyes!  She even had the thought to make a spare one removable so we can put it on the door for year seven.

So many wonderful creations.  My niece even made us another baby dragon to go with the other I posted before.  (I will get pics up when I get a chance.)  I loved everything so much.  We definitely had Xmas early this year!  (Notice the bowtruckle in there? See below.)


If you saw the bowtruckle in the book pic above, it was my first attempt at Pickett as soon as we got back from the movie.  LOL  He is simply made by cutting/wrapping a couple flower stems I had in my craft stash.  We call him "Stick-ett" (Pickett's cousin).  I did make a more detailed one for my sis later that day using wire, tape and fabric paint.  I will hopefully get some pics of that one soon.  Until then, have a Harry Holiday!

If you want to see more cool stuff, please go check out my sis's facebook page, Creepy Creations.  Jamie makes some really awesome Halloween themed stuff, too!