Saturday, December 25, 2010

Homemade Holiday - Part Two

In my previous post I showed the dollhouse that our daughter received from her father made out of cardboard. Now, I'd like to show you the plush stuffy and accessories that I made her. It was a real challenge not to buy materials for this challenge.


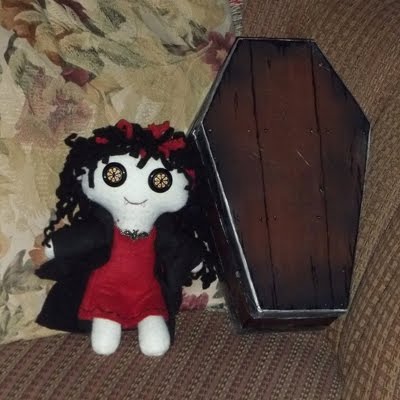
If you have kids, she may look very familiar to some of you. My daughter's been wanting the vampire, "Draculaura", Monster High plush doll for some time now. I just couldn't see buying something I can make. So I attempted Draculaura's close cousin, which my daughter named "Batsy", and her pet "Batley".


She and her clothes are almost entirely made from remnant polar fleece I already had around. Even her hair is thin strips of fleece. I made her a two piece black dress, red dress, black coat, apron, and a spare skirt. Batley's body was made out of a pom pom with red button eyes and polar fleece covered chenille stem wings. (My daughter said the bat looks like the crystal bats from the Jim Henson movie "The Dark Crystal". I hadn't thought of that 'til she said it. :) )

Polar fleece is great to work with. It doesn't fray and my messy stitching doesn't show too badly. :) However, there is one thing about it that I could do without. That's the shedding. I had to take the lint brush to everything several time before I was finished.


Here hair is a removable wig that is velcro'ed to her head. I will probably make her a few different hairstyles/colors to mix and match with her clothes, in the future. She has button eyes and embroidered mouth and teeth. I even added some bite marks to her neck. The necklace was a wine bottle charm my sister had given me a long while ago. She thought it might come in handy for something, and it did!


The coffin was made of cereal and other cardboard boxes that were covered and painted. I added the remnant satin lining. The lid has a pocket for her accessories.

Well, that pretty much wraps up what we did for Christmas. Hope you've enjoyed taking a peak and are inspired to try this yourself next year. :) Happy Homemade Holidays!

Homemade Holiday Dollhouse

Daddy and I made what I think was a challenging decision this year for Christmas. Since "Santa" was getting our 8 year old daughter popular name brand items, we thought we'd try something a little different and make her gifts. This wasn't new to me. I 'm accustomed to making my gifts for the holidays. But, for us both to only make gifts and not buy anything was the challenge. It's always nice to have a backup gift just in case your idea doesn't actually work in reality. I'm glad we made this decision, though. It was interesting to see her reaction this morning. She really did prefer the homemade gifts more than the store bought ones. Probably won't be the case when she's a little older. :(

So daddy, being an architecture major in college, set out to create her a cardboard dollhouse inspired by a $250+ dollar plastic Calico Critter Manor house.


It folds out just like the original version. Forgot to take a pic of it closed. He started building it 2 weeks before Christmas! I must admit, we (mom and I) didn't think he'd have it standing in time. But, he brought it thru the door at 10pm Christmas Eve. :) Whew! Time to spare! ;D Of course, it needs some paint and details still. He wants her to help him out on the colors and furniture. :)


It has lots of large windows, and the little doors actually open! Pretty amazing for cardboard.


He still has some supports to add at the corners in the interior. They'll be needed to withstand the weight of her plastic furniture pieces.


The Calico Critter families couldn't wait to move in to their new home (even if it's not finished, yet). :)


I really liked the spiral staircase. It looks so delicate, but is surprisingly sturdy. I'm really proud of him. This was a LOT of work to take on. But, she loved it. Making a unique gift like this is truly worth every bit of the effort. I'm sure she will treasure it for years to come. This is Samedi's first year to make gifts. He doesn't really even give gifts. Being Asian, he really doesn't celebrate Christmas.

I'll post about my gift to my daughter next. And, I'll be sure to post some progress pics as they start decorating. Until then, Merry Christmas!

***** UPDATE 01/06/11 *****


Just wanted show a small addition to the house, I posted this image on Craftster, so you may have seen it already. He won't leave well enough alone. He finished the front balcony railing and a round attic window. I'll keep you posted when more improvements are made.

Friday, November 5, 2010

The Lowdown on the Steampunk Drink Dispensing Bustle

I had a request to show the drink dispensing bustle I wore with my Halloween Steampunk costume. I discussed it briefly here. I warn you, it isn't pretty. I was short for time and it is nothing but functional at this point. :)

Here is a close up of what the cutoffs would look like under the lacing of the corset:


All that could be seen of the dispenser was the cutoff knobs, bicycle pump and a tiny bit of hose. Well, and my larger than normal bum. I know, it wasn't very steampunk of me to hide everything. You'll see the reason I chose to conceal most of it under my outfit in a sec. :)

There are three cutoffs shown. Though I had only two functioning for this maiden voyage. The third was to be an air tube for weapons and other gadgets. But, after testing the tanks for weight problems on my back, I may just add a third tank!


The bicycle pump pushes air to all three cutoffs. But, air will only continue through the open valves. So, I had to remember shut all but the one I wanted to use. For wine, this air then travels to the tanks in back pushing down on the liquid in the tank and pushing it up through the dispensing hose that ends on my left hip. The water is the same, except that it ran through the right sleeve of my dress. I will eventually have a water gun attached to that one.


All together I had about $30 in the whole setup including the dresses. The brass cutoffs were the most expensive parts at about $6 each! I used 1/4" tubing and garden sprinkler parts for most of the inner workings. The hose connectors on the tanks are actually gold plated coaxial cable connectors that I found. I had to melt out the plastic to use them. I don't condone using unapproved parts of unknown origins, but I'm not using this everyday. And, most of the parts do not come in contact with the liquid in the containers. I made my own "O" rings out of wide rubber bands. It worked really good to seal the connectors.


I was really please with the results of this project. After a few minor improvements, I may make a smaller version as a regular accessory for my ren garb. ;)

Thursday, November 4, 2010

Halloween Steampunk-style


Yay! I barely got my steampunk Halloween costume wearable in time. But, I finally did manage to finished the tabistry underbust corset and a mini top hat I'd had planned for my outfit (see my post on my tabistry blog for more info on the corset and mini top hat). But then, I went and forgot to bring my shoulder straps for the corset with me. Darn it! We had a blast, though. Yes, I know we attended a "renaissance" festival, but it was Halloween and pretty much anything goes for Halloween weekend.


For those of you who don't know the details of my evil plan. I hid two 2 liter tanks (wine and water) under my bustle and created a drink dispenser . I had cutoffs (shown in the first pic) poking out between my corset laces on my front. I just switch to the tank I want and pump my bicycle air pump (seen above on my right hip) to dispense. It worked like a dream until the connection to my pump broke midday. I went back to camp for a quick repair and tank refill. I also had two extra large pockets on each side that carried soda bottles for the others. I used, what else but, can tabs to create a half length cage bustle frame that covered the tanks to keep the shape right..

I had a third cutoff that was an air line, to power a future weapons and gadgets like a fan blade parasol. Maybe next time I'll have some weapons to play with. Muwahahaha...!!

Monday, October 25, 2010

Yurtle, the yurt in progress


Over a few weeks ago my sweety was slaving away building me the frame for our dream home away from home. Is my man a provider, or what?! :)


Looky here! Even has a sky light. :)


Umm, well...okay, so its not exactly a dream home. But, it's pretty cool to me so far. :) It's called a yurt. And, it's based on traditional portable nomadic dwellings used for hundreds of years. Go look them up. You'll be amazed at what is being done with them.

If you've ever tried roughing it the primitive camping way, sans electricity, etc..., you might understand the important of quality shelter. My man is just over 6 foot tall. And most tents just won't due for him. Plus, the weather here can vary drastically from day to day from extreme heat and humidity to down pours of rain to freezing and the very rare snow fall. Well, this baby has 6 ft walls and an 8+ foot center ceiling. We decided to make our first attempt a decently sized 12 foot diameter. And, these yurts are designed for long term shelter in extreme temperatures. They ventilate very well keeping it warm at night and cool during the day.

Additionally, we camp on grounds that can get pretty crowded and crazy with people on walk-abouts tramping though your site tripping on your neighbors guy lines (drunk traps) and into your tent. Our yurt shouldn't give way to the average-sized drunk. I like that I can hang things from the ceiling (like a chandelier if I wanted) without too much worry of it collapsing. I'm going to find myself a full length mirror for dressing when I can manage it.


I sewed the walls and roof covering myself on my vintage 60's "Carl" heavy duty home sewing machine. It did a fantastic job going through all the layers of canvas without a hiccup. Though it was pretty tricky getting all that fabric through the machine, I was even able to flat feld the roof seams (like you see on jeans) to make them stronger and more water tight. :)

We've got a lot to finish on our yurt still. But I thought I'd show you all the progress pics, anyway. I need to add some grommets to the roof cover, finish the flooring and decorate the interior. I plan to paint the coverings to a more traditional look, I think. The camo print just isn't doing it for me. :) But, it was a bargain and kept us dry in the light showers we experienced, so I can't complain too much. We still need a floor over the ground tarp and an inner lining for the walls would be nice when it gets a little colder.


We camped in it twice so far. The pic above was taken our first trip without a finished roof. The frame all fit easily on the roof of our Jeep Cherokee. So far, we average about 2 hours of setup time. Most of which is spent tinkering on things that didn't get done. It was really comfy to sleep in. Even taking a nap in the middle of the afternoon was comfortable in the Texas heat. It was cool to look up at the repeating pattern of the roof members, too.

Tuesday, October 19, 2010

Looky LOOKY what I received from Dfly Creations!!!


My sister recently put me wise to an awesome blog called Dollhouse Mini's by Dfly Creations created by the wonderful and rather too generous Lorraine. She makes some amazing and very tiny miniatures with crazy details. And, I was one of the winners in her guessing game giveaway organized to celebrate her blog reaching 100 follower! She sent me this adorable little blue wand and box! (There are clearer and more detailed pics on her blog here.)

I'm so amazed at the details! I can really appreciate the effort that goes into these miniatures after working on my tiny witch boots. You really need lots of patience and a steady hand. There is even a label on the side of the box. My daughter spent quite some time trying to make out what it said. :D


While I was snapping off some quick pics, a visitor stopped by to check out the wand. This wolf spider ought to show the tiny scale of the wand pretty well. :)


It decided it wanted to pose for a few shots. :) Who am I to argue?! I was starting to worry that it might run off with my prize!

Thank you so much for the awesome prize, Lorraine! My mom is working on a miniature witch cabinet that this will be displayed in with pride.

Monday, October 18, 2010

Pirate Sunbrella (and a witch boot update)

So many things I want to finish this month! Oh dear, what's a girl to do?! I've been so busy trying to get my steampunk costume going that I've not been able to finish painting the witch shoes. But, more on that later. Right now I'd like to share a revamped paper sunbrella I painted for past opening weekend at TRF.


I wanted something pirate-style for my outfit. And, I got a bit of insomnia just before we left obsessing on all the things I would forget to bring to faire with me. That on top of being stumped on how to continue painting the witch shoes. I distracted myself with, what else, but a new project. :) I'd been meaning to try this one for a long while now. Not sure what possessed me to buy this pale pink paper umbrella with my SO in chinatown back while I lived in near Los Angeles, California. I've had it for over 10 years now. But, it started calling to me to paint it. So, I did...in just one evening!

I'll have to get some better pics of the details. His eye is actually bloodshot and it and the dot border are the only things bright white. The eye is kinda funny. It looks more like a telescope bugging out that way. Maybe it should have been more steampunk than pirate. :)


It came in really handy that sunny faire weekend. After I got back here I gave the umbrella to my mom for her garb. What can I say? She wanted it. And I just can't say no to her. :) Good news is that I have another of these bamboo framed umbrellas that needs to be totally recovered thanks to my daughter when she was young. I want to put silk on that one, but don't think I'm ready to attempt that one just yet.

***** WITCH SHOE UPDATE *****

Anyone wondering what happened to these? I just haven't been feeling up to painting the shoes. I've been stumped. I think I have the two smaller ones figured out. But I'm not happy with them just yet.


The small orange one is the furthest along just needing something on the green band, heel and perhaps the orange toe. And, I haven't found a dangly spider just right for the toe, yet.

The orange/purple shoe with the JOL's and flames has really stumped me. It's really busy and is making it hard to think up what to paint on the purple. I have a bonfire on the heel area and was going to paint some demons dancing. Not sure if that will turn out the way I want.

I've started the moon toe of the large green shoe. I want to add black cats to the large green shoe. For some reason I just can't stop pondering on painting them. One the other hand, I keep thinking of Frankenstein when I look at the shape and color of this shoe. Which should it be? Zombies or kitties? lol

Well, that's all for now. Wish me luck that I get these shoes finished before Halloween along with my costume!

Thursday, September 30, 2010

It was an itsy-bitsy teeny-weeny orange and black painted booty...

...that we made this past week. Actually there were more than one attempt. But, this is what you get to see. :)


Just a few posts ago, I showed you my "A Little Batty" paper mache witch boot above. I called it a "mini" boot. Well, today I have TEENY TINY miniature version. And, it's a pair! Finally a pair that match! Sorta. See those two tiny things in the right of the pic above?


My mom was attempting to make some miniature witch boots to go with her curio cabinets that shes been working on. (She already has the hats and spell books down.) And, I'd also coincidentally had a request to try a tiny size version. So, mom and I worked it out and came up with these.


It was all a matter of getting the pattern pieces right. The less we have to fuss with the shape, the better chance we have of them turning out similar. :) These tiny terrors stand about 1 3/4" tall and 1 1/4" long from toe to heel. They're not completely made of paper mache as before, though. This time we had to add in some clay stuff my sister recommended to get the toe curl. We also used the clay to spackle over the tiny holes smoothing it out. The painting was a real challenge. I knew I had shaky hands before this. But I didn't realized just how bad until I started to paint with my one-haired paint brush. I also tried an ultra-finepoint sharpie for some black details. I think I prefer painting the original scale.


It was also a slight pain to lace them, as well. But I managed it without too many curse words. Had to use a fat needle to make the lace holes. And, since the laces were too thick to double over, I had to dip the ends in glue to stiffen them. Then, I could poke them through easily.


I really admire miniature artists who have the patience for the meticulous details they work with. I've heard that all artist have their own scale they work best in. I'm not sure what mine is, but I'm certain it isn't 1/12th. :)

Thanks for lookin'. And, stay tuned. There'll be more frighting footwear to come in the next few weeks!

My Amazingly Crafty Sis

My own sister, Jamie Moore at Creepy Creations, has been up to some awesome things lately. She's been a busy girl with Halloween just around the corner. But, she managed to participate in the Halloween Queens' month long giveaway! 31 prizes in 31 days!! Can you imagine! Click on the banner to go to their blog for official rules! Drawing starts tomorrow, October 1st, until the 31st where there will be a grand prize! She has donated a really cool Jack O’Lantern charm bracelet that will be given away on the 23rd!


On top of that, a couple of pieces of her work have been featured in the 2010 Fall Issue of Celebrate 365 The page spread is loaded with awesome Halloween folk art! If you don't believe me, go check it out by clicking the image below!


And best of all, she finally has her Etsy store, creepycreations, stocked with her fantastic work! I've been hounding her for months to get her stuff on there. She just started listing items at the end of August and already has 4 sales. That's awesome! Go follow her blog at Creepy Creations, so you don't miss her new work available. Can't wait to see what creepy cool items she posts next!

Tuesday, September 28, 2010

Tim Burton Inspired Witch Boot on Ebay!


"Every Halloween night, when the moon is just in sight,
Place pumpkin lanterns on your porch to stay.
They are not very bright, with just a candle for a light.
But they frighten all the dark things away." - Tiffany (mieljolie) 2010

The last Paper Mache witch boot is on eBay here. It should end Sunday evening.


I was trying new things, again. So, the heel is a different shape than the previous boots, tapering in at the bottom instead of flaring out. And, the ankle top is a little shorter. Looking at the stance and shape of this boot really made me think of something in the world of Tim Burton. I love his movies, so I wanted to pay homage to his work (without copying it blatantly). I thought it needed an unusual color to go with the shape, so I chose the purple, which reminds me of a dark spooky night scene. The trees are stylistic, almost cartoony, to go with the creepy mood. I was going to paint some skeletons, but I thought too much white would take away from the toe and heel. Then, when I was painting some branches on the trees, a face started to appear at the bottom in the purple background. It later became the large pumpkin above. Maybe now, some will believe that these pieces do tell you what they want to be. :) That or, I'm just bonkers.


The left and right sides are painted similarly. The left moon is asleep while the right is awake. And, they are wearing a striped nightcaps.


Experimenting with the laces, I relaced this one at least six times in different ways before deciding to add the polymer clay skulls. I was getting bored of just black laces and wanted something unusual. But, the ribbon was too wide and covered to much of the tongue where I had painted another creepy tree. What do ya think? Daughter commented that they looked like little winged skull butterflies. :) I think she's right on there.

Hope you like it! Now, to get busy on some shoes!

Friday, September 24, 2010

"A Little Batty" Boot Available on Etsy!


Just listed this little orange paper mache witch boot on Etsy.com. In the spirit of this boot, I wrote a quick little rhyme about it for the auction:

"As the full moon rises in the midnight sky,
above a lonely graveyard the ghosts fly by.
They've come to greet the boisterous bats,
and scare the fur off the lazy cats." - Tiffany (mieljolie) 2010

It's a mini-sized version standing 6 3/4" tall and 6" long, that I've named "A Little Batty". The size was based on a tracing of one of my daughter's shoes when she was 6 years-old. Yes, she has large feet for her age. She's going to be really tall. :)

The right side of this boot is of a ghost in a graveyard with an owl looking on in an old tree.


The left side has a group of bats flying in front of a full moon above another section of the graveyard with a scared cat and two other ghosts.


I added more bats to cave scene on the heel and the tongue. And, added a few "fiend"-ship pins to the waxed cotton cord laces.

Hope it captures the spirit of the holiday. Have a great Halloween!

http://www.etsy.com/listing/57232042/original-vintage-style-halloween-witch

Tuesday, September 21, 2010

"Bewitched" BOO't available on eBay!


Just finished the largest one of the three sizes of original boot styles I posted about here. This is the green one with the grayish heel and tongue. I hope I've improved upon it since the base coat pics. :)

I've added a few "fiendship" pins to the top right of the laces with a JOL pumpkin attached to one. The boot has two witch scenes.


The left side has a witch stirring a cauldron with a cat batting at the steam. And, an owl in the tree. I put some some handmade polymer clay skull bead dangles on the laces to match the random ghostly skull faces on the heel.


The right side is of a haunted house with a witch flying high on the sky on her broom. (Guess she's off to the 24-hour Potion-Mart get more ingredients for the brew in her cauldron.)


I tried something new with the laces of this one. I decided on the ribbon I use to weave my "tabistry" favors. It has a kinda mummy-like quality with some eyes peaking through the laces. The lettering on the tongue took me awhile, even using the paint pen instead of the paint brush. But, if you've seen my everyday handwriting, you'd know it is barely ledgible. :)

I wrote a quick little rhyme for the boot:

"A witch stirs her cauldron in the murky moonlight,
while the woods around her settle in for the night.
"EGAD!!", she shrieks as she grabs her last jar
of "Dr. Pimply's Most Amazing By Far Beauty Restoring Tar".
In a flash she's off on her broom like a dart
to get more tar from her nearest Potion-mart." - Tiffany (mieljolie) 2010


Please check this Bewitching BOO't out at my SO account on eBay here! It should end sometime Sunday evening. Thanks for looking!

Have a SPOOK-tacular Halloween!

Tuesday, September 14, 2010

The loveliest, sweetness thank you!!

Just this past Thursday, my mom, daughter and I received the nicest "thank you" surprise ever. If you're up to date with the last couple posts I've made here, you'll know that I did a craft swap with MissingWillow. Little did I know that my family would help me out so much with it. Well, to say thanks, my dear swap partner sent my mom the most amazingly beautiful tribal necklace, my daughter some adorable banana scented ducky soap and a cowrie shell necklace, and my sis what I'm guessing is also soap. She even sent me an awesome kuchi pendant so I wouldn't feel left out! :) I just had to share a pic of these wonderful items that aren't making an appearance in the swap gallery.


Mom was giddy and couldn't wait to wear her necklace, so she wore it out to eat on Saturday night just for fun. She said that on her way back to our table from the restroom, a couple of girls complimented her on it. We also have a local ren faire, Middlefaire, coming up this weekend that she is planning to show it off at with her tribal outfit. I'll try to get some action shots of her. I'm probably going piratey, but I'm determined to incorporate my pendant into my outfit somehow. :)

Her homemade soap looks and smells wonderful. She said it's made with milk from her own goats! I don't have the heart to use the ones I received in the swap. But, my daughter didn't seem to have the same qualms about it. She's been using her ducky soap at bath time and loves it.

Just have to say THANKS,again, to MissingWillow for the very unexpected and absolutely wonderful thank you gifts. You've been such an awesome swap partner!

Friday, September 10, 2010

New Witch Boots (and SHOES!!) WIP


Here are some sneak peaks of what I've been working on this week. I had so much fun decorating the last paper mache witch boot for my swap that I decided to take some time to make a few more experiments. This time I tried some low cut shoes, too. I haven't decorated any of these past the base coats, yet. But, I can't wait to start painting the scenes and adding the little extras. Still deciding what to paint on them.


Above are a few more of the original style boots. The orange one is a mini, while the other two use the same regular footprint. Though, being hamdmade, they tend to develop a personality all their own as they come to life.


I've been experimenting with the height and shape of the heels just a little. And, I've also added a lighter purple to my palette. I think I'm planning to creep this purple one up with some skeletons and maybe a graveyard.


This orange shoe turned out so cute it may wind up my favorite of this bunch. Not sure what I will paint on it, yet. Probably some JOL's, I think.


I've got a couple more that are in various stages of completion. The tall boot just above was an experiment in trying a more Victorian style. I want to put buttons on the sides. It sure didn't want to cooperate with me, so far. :)


The shoe will have laces in front instead of a buckle. I haven't decided what color it wants to be painted.

I was hoping to get all of the boots and shoes finished before the end of this week and available on either Ebay or Etsy to those who'd like one, which isn't looking possible at the moment. I don't normally offer my crafted items for sell. But, having so many on hand, I'm trying something new. So, hopefully sometime next week these boots might make the market. I'll post as they are finished and available. If you want one, don't delay. These spooky paper footwear will most likely be a limited time offer that will disappear along with ghosts and goblins of Halloween.

Thanks for dropping by!