Monday, November 21, 2016

Our Yule Ball - 4th Year Hogwart's Party


Had a FANTASTIC weekend!  Just wrapped up our 4th annual Harry Potter themed party.  We hosted a Yule Ball to celebrate two of our family members b-days.  Also got to go see the new "Fantastic Beasts and Where to Find Them" movie!  Thought I would give a quick preview of all the stuff we made and received at the party. My sis and her daughter overwhelmed us with some of their awe-inspiring creativity!!! (I'll probably post some more better pics when the dust settles.


As we have done for the past three years, we decorated the whole house Hogwart's style.  And, each year the theme and activities of the party match the corresponding book.  This year was all about the Tri-wizard cup, Yule Ball and Mad Eye Moody.  :)  We had a DADA earthworm fountain, foe-glass dark detector, goblet of fire for choosing champions, and much more!


We made a couple golden dragon eggs.  I used paper mache over an 8 inch tall plastic egg.  The top clasp is polymer clay.  I wanted to make it open, but found it to be too complicated for the time I had to make it.  But, I may go back and cut one of them open at a later date.


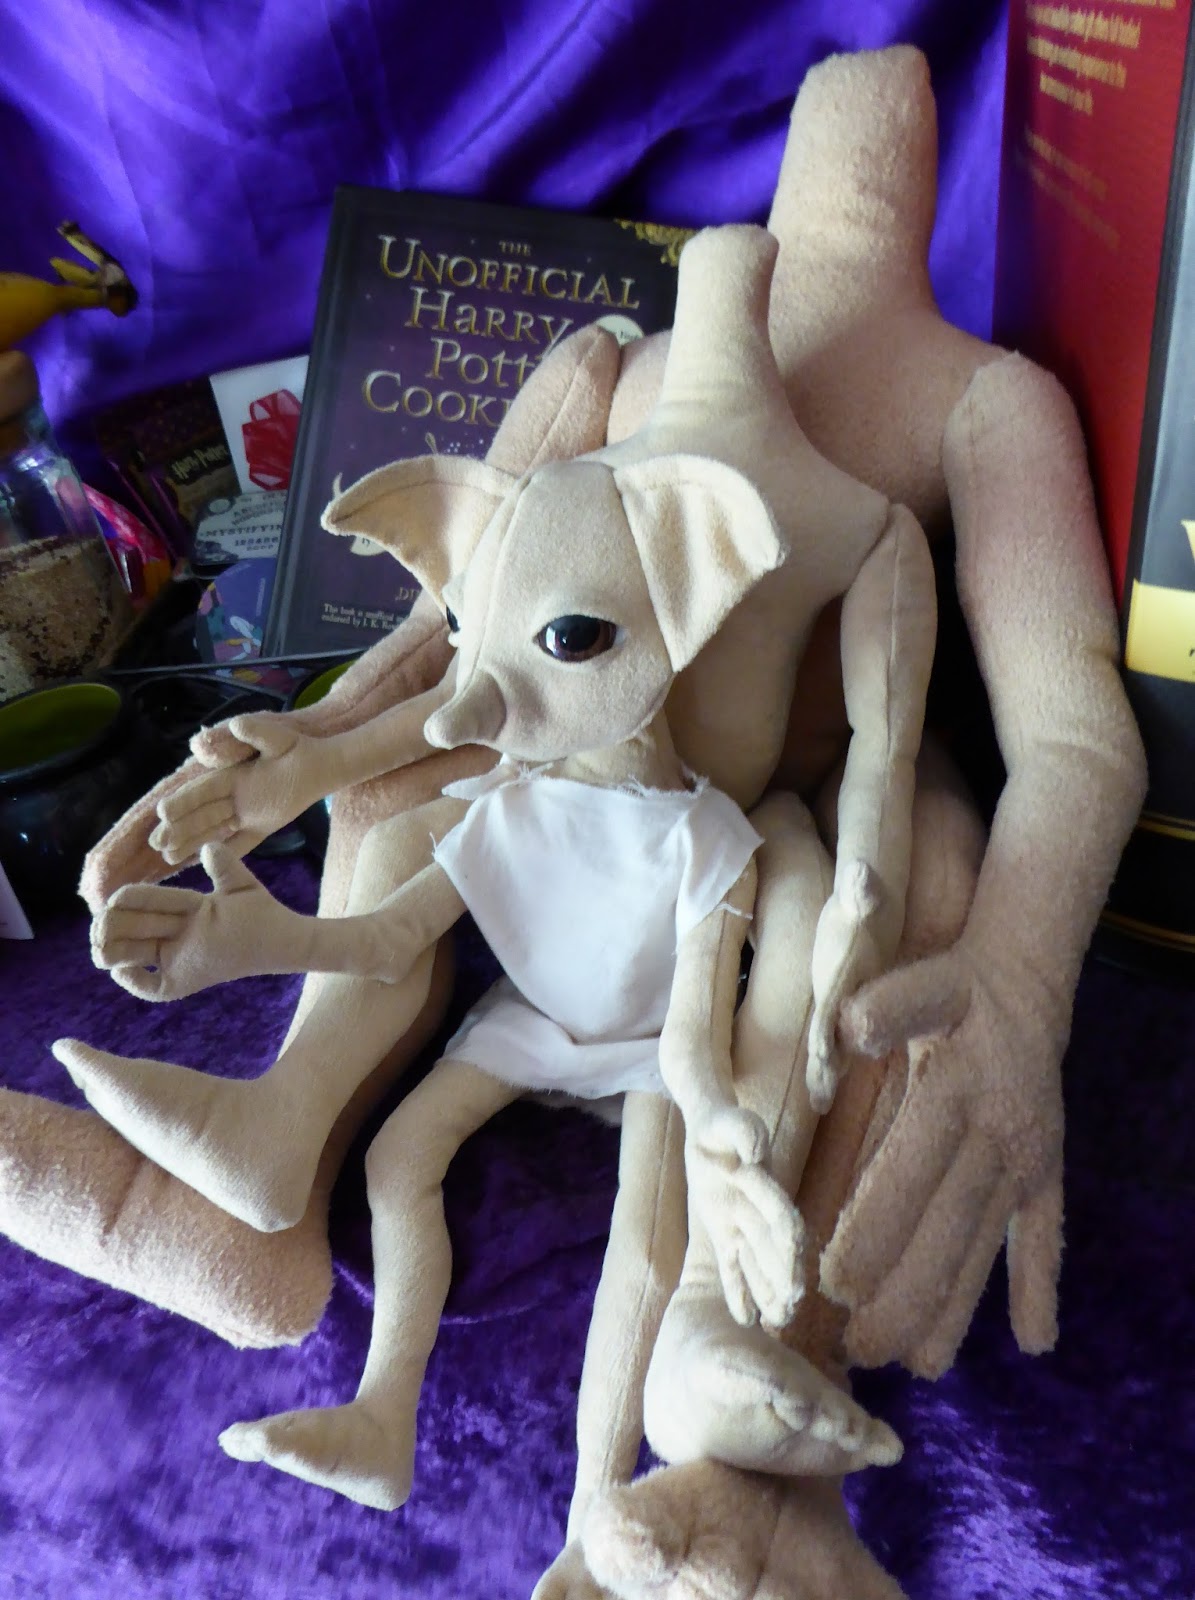
My mom and I also worked on our first attempt at a Grindylow.  He was a mixture of a couple of our patterns for the gnome head and the house elf's jointed arms.  The tentacles were a big challenge.  We plan to go back and make another slightly larger version with larger tentacles and head.


Since this was first and foremost a Yule Ball, we spent a great deal of time turning our Great Hall into silver dance hall with decorations and lighting.  :)  We taped silver wrapping paper to the walls and made faux ice castle sculptures out of plastic beverage containers and icicle lights.  We also had an extensive wizard rock and HP parody playlist for the evening.  (If you'd like to hear some of the songs:  https://www.youtube.com/playlist?list=PL5bioASvRaQqMoQGlhpkkf6ne3L2xv3ZL)

Since Harry receive b-day cakes from all his friends while Dudley was on a diet, we asked the guest to bring 3 cup cake each for a competition.  One for each birthday person and one for a "cake walk" or exchange where they could receive a different cake.  We had some really clever submissions.  (I will get the pics soon.)

One of the last tasks we planned was a "Pin the Nose on Voldemort" or "You Nose Who".  We had guests stick it to Voldemort by hanging two laminated Voldy Faces on the wall with a selection of noses to pin him with. (Will get pics.)


For the last task, I drew up a quick Ministry banner on brown paper for above our cemetery laden mantle.  (This awesome instant cemetery is the work of Crafterella.  I received it in a craft swap a few years ago, and I just love it.)

And, speaking of craft swap, we received the craziest, coolest, most amazing items from my sis and her daughter this year!


They made us a faux stain glass mermaid window like the one in the Prefects' Bathroom.  It is so cool!  They used Gallery Glass on a textured plexiglass.


And this amazing piece!  I'm still reeling from this one!  I've wanted the hog-headed pumpkin juice pitcher since I saw it in the first movie!  She did an unbelievable job on the head details!!  :O


She even had the time to make us a textbook cd box which is perfect for our growing Wizard Rock and Audiobook collections!  We were so spoiled this year!


My sis also made some Mad Eye Moody Eyes!  She even had the thought to make a spare one removable so we can put it on the door for year seven.

So many wonderful creations.  My niece even made us another baby dragon to go with the other I posted before.  (I will get pics up when I get a chance.)  I loved everything so much.  We definitely had Xmas early this year!  (Notice the bowtruckle in there? See below.)


If you saw the bowtruckle in the book pic above, it was my first attempt at Pickett as soon as we got back from the movie.  LOL  He is simply made by cutting/wrapping a couple flower stems I had in my craft stash.  We call him "Stick-ett" (Pickett's cousin).  I did make a more detailed one for my sis later that day using wire, tape and fabric paint.  I will hopefully get some pics of that one soon.  Until then, have a Harry Holiday!

If you want to see more cool stuff, please go check out my sis's facebook page, Creepy Creations.  Jamie makes some really awesome Halloween themed stuff, too!

Monday, September 26, 2016

Monk Robe Pattern with Hooded Cowl


This robe was a quick project we came up with after finding some great knitted fabric on clearance.  We thought we'd do something different for first weekend of the Texas Renaissance Festival this year.  So, we're hosting a Monty Python Invasion.  (I'm amazed how the interest in our event took off!  Already have 80+ people listed as going and many more interested! ) Should be a blast.  You can join our event here:

https://www.facebook.com/events/1641099259548673

If anyone is interested in making these quick and easy robes, here is the pattern layout I used:


The robes took a total of 105" of 60-inch wide fabric.  I set it up so that we could take advantage of the unique ratty looking selvage edges to avoid having to hem.  If you're unsure how it goes together, feel free to ask questions in the comments.


Also working on a prototype for our fake wooden planks.  They're made of layers of corrugated cardboard.  Still need to be painted, but I made them open up to a silly walk sign inside.


We also put together some reversible silly walk signs made with knights that we will have posted around camp.  I designed the sign in Adobe Illustrator before printing on cardstock and affixing them to paintsticks with staples and spray adhesive. (If you'd like the digital files to print your own, just message me.)

Still hoping to get some knight's surcoats made, too.  Wish me luck and time!  :)

Wednesday, August 31, 2016

House Elves and Pixies are Available

Just listed a couple of smaller house elves and some more pixies.  Here is the listing for the elves:
https://www.etsy.com/listing/462440268/plush-jointed-house-elf-inspired-by-the


We've been finalizing the house elf tutorial.  Now that the head/face are pretty much settled on, I just need to get some better pics of the construction process.


The one is being dubbed "Morty".


And this one is "Wally". They are both the smaller 13-14" tall.


And, the new set of plusher pixies.  These are much safer for kids.  The arms and legs are sewn in.  So happy to have found the plush pixie fabric again.  My sis found it in Kansas.  Our stores do not seem to sell it, and I can't find it online, either.  :/


That's it for now.  The tutorial should be available soon!  (I really do mean this.  I seem to say this, and then something will come up to delay things.  But I am honestly trying my hardest to get it ready.)

Tuesday, August 2, 2016

More House Elf Progress


Took this guy to the Midnight Release Party for "Harry Potter and the Cursed Child" Book.  He's the latest house elf finished after all the pattern alterations I've been playing with.  We've been calling him "Gummy" due to his toothless grin.  I'm so sad that I already finished reading the book in only two sittings.  It went way too fast.


This is Gummy before fixing his mouth into a smile.  If you've been following me on Facebook, you've probably seen me posting quick progress pics to get opinions as I attempt to perfect the heads.  I'm pretty happy with the bodies.  The shoulders are a little broad, but this is due to changing from the button joints to doll joints.  Without the thread running between them, there is no tension holding them together.  I may reduce this at a later date.  Especially if we make another Kreacher with his slumped posture.


This is a before/after shot of the shoulders, ears, eye, and head shape changes.  I'm really pleased with the new ear shape and placement.  But, I've really been struggling with those eyes. I'll show that more in just a bit.  I think the top of the head could be a wee bit wider, but I'm not going to fuss with that this go round.


I was having a lot of difficulty getting the elves to not be either grumpy or sad looking.  I thought it was mostly because of the eyes, but with the help from someone's helpful suggestions in a Harry Potter group, I've discovered I can make their expressions more happy and less mad/sad by creating tension in the cheeks.  The image above is Gummy before and after running thread from his outer eye corners to the corners of his mouth.  So happy!  And, I am too!  :)


The eyes are really bugging me.  At first, we went back and forth with using just plain doll eyes with no lids.  But, this makes the elves look spaced out like the two on top in the pic above.  I did find a way to line the back of the eyes to create eyelids.  I like this, but it's just not right just yet. And, I'm just not happy with eyes with no scleras (white parts) and huge pupils.


So, I tried painting some ping pong balls just to see what it would look like.  I really think it looks more like Dobby, but still a bit creepy.


The above image is of the same elf head (with over-sized eye sockets) with different eyes.  I've been trying different sizes as well as different materials.  Besides looking weird, it is sometimes difficult to find the safety doll eyes large enough for the elves at the larger sizes.  And, they can cost a good deal more when I do find them.  I was also hoping to find materials anyone can find locally for the tutorial.   At first I tried painting and got the iris too big and the pupil too small.  The last two sets in the pic above show a new solution that is promising.  It's a ping pong ball with the safety doll eye poked into a hole in the ball.  The green iris is smaller and centered, and looks scared.  The larger brown eye is off centered and can be rotated for different expressions.  These are great because they are less work, and have the safety back to secure them.  However, the down fall of these is that the eyelid gets caught behind the iris.  Perhaps I need to find a way to glue the iris to the sclera with no ridge between.  I'm also looking into resin as an option t cast my own eyes from scratch.  I'm also wanting to try to transfer printed irises to the white plastic ball.  But, I really need the safety back to secure the eyes in, so they can't be popped out easily.

That's where I am, so far.  I'm hoping to get this figured out so I can wrap up the tutorial. with the best options.  Wish me luck, again!

Friday, July 15, 2016

House Elf Head Progress


Been busy working on the House Elf tutorial.  I've got the body portion pretty much finished.  But, as the pics show, we're making some changes to the heads at this point.  I'll need to wait for the pattern changes to be settled on before I can get the pictures in place. 


So far I've gone back and forth on the size of the eyes, changed the shape of the ears a few times, and played with the angle of the nose/forehead a bit.  Still debating to move the eyes closer together and curve the ears even more.  I would also like to make my own eyes.  These have no whites around them and the pupils are too large.  I think I may have figured out a solution using resin, but I still need to get the supplies to try it.  I think I may wait until after the tutorial is finished using these, since they are less work (though somewhat hard to find).


We are amassing quite a few heads, so we thought we'd use some of the less successful ones to make plaques like the Black family house had on the walls.  :)  I'll share our results on that when I'm finished with them.  In the meantime the tutorial should be available within a month or two, I hope.


Oh!  Btw, here are three body sizes that we've tried so far:  A small 12", a medium 18", and a large 24" (The large is made with a thicker furry-ish fabric.  They will also have heads, soon.  :)

Wednesday, April 27, 2016

Gnome Tutorial is finished and available on Etsy!


Gnome tutorial is finished!  You can find it here:  https://www.etsy.com/listing/291683093/how-to-make-garden-gnomes-pdf-tutorial

It contains step by step instructions for making our garden gnomes inspired by the Harry Potter series.  We used the Chamber of Secrets and Fantastic Beasts references as well as the Pottermore website and video games.


The Tools and Supplies list looks daunting, but I tried to describe each item so they would be easier to find.


There are options to make them into bean bags or plain dolls.  And, they can be made with or without eyes.


Hope you like the tutorial.  If you try it, I would love to know how it goes!

NOTE:  If anyone has interest in a kit including all fabric/supplies for one of my tutorials, please message me. I'm curious if this would be of use to anyone, especially in doll making. I can buy eyes/joints in bulk that could save you money and time hunting down supplies. I also have surplus supplies for my other crafting projects.

Wednesday, January 20, 2016

DIY Makeup Organizer Upcycled for Zero Money


For some time now I've been considering solutions for organizing random makeup.  I've accumulated so much over the years for costuming that my bag/basket is out of control!  I'm constantly digging for hard to find things in the bottom.  Well, not long ago someone posted a product on Facebook that was actually pretty clever and totally DIY-able. It inspired me to try constructing my own upcycled version.  (However, at $10-13 each velcro palette,  the "Beauty Butler" (http://getbeautybutler.com) product is reasonable enough for the more lazy non-Do-It-Yourself-ers.)  But, this post is not about how to make those.  I have another idea that would work really well in conjunction with a "Beauty Butler" type system.

The one thing I don't like about this velcro method, is that I still have to lug around all those plastic cases for each color of eyeshadow, blush, powder, lipstick, etc...  I usually end up with many multi-color sets that I only like one color in, anyway.  Don't get me started on the almost empty containers of colors I can no longer find.  So, I got to thinking, and came up with a fairly easy down and dirty and absolutely FREE version using stuff I had around, of course. I used clear acrylic DVD cases and sheet magnets.

I turned all of these:


Into these two cases:


Concealer, powder, blush and lipstick in one, while eyeshadows are in the other.  How I did it was pretty easy, though I won't lie, it is not for all makeup.  Some brands do not use the same metal pots as most do.  And, some can be near impossible to remove from the cases.  It did work well with about 98% of my compressed cake makeups.  I chose to try this with my older used makeup (Hence the half empty pots and worn out cases in the pics.)


I started by removing the metal pots from the containers.  This is probably the trickiest part.  Some are glued in better than others.  Cover Girl, Maybeline, MaxFactor, Almay, Clinique and Este Lauder all seemed fairly easy to pry out with a razorblade or thin palette knife.  But, they could change their packaging at any time.  Please be careful if you try this, especially with expensive makeup.  Be patient.  The glue will need time to release slowly in some.  (If you crack or crumble some of the powder content, it is easy enough to fix them.  I use the lid on a chapstick or any clean flat object I could find to tamp the powder back into the pot., But, it really only happens when the powder is almost gone or in a flimsy pot.)  Don't forget to remove the mirrors, too.  You can stick those right in with the pots, or glue them to the case lid.


I removed the disc holder liner from a DVD case and cut the part with the hinge off and put it back in the case to use as a brush holder (I cut it using my trusty jeweler's saw.  I can't stress how handy these saws are for crafters and DIYers.).  If you cut it just after the hinge, the narrow compartment should open up when the case is open.


I lined the flat side of the case with a large magnet sheet I happened to have.  You can also tile the smaller business size magnets.  A little spray adhesive should hold them in place.  You can cover the back with some paper or other material to hide the back of the magnet in the clear acrylic case.


Now, I arranged all the various makeup onto the magnets.  The little tin pots normally contain iron and will stick to magnets with no need to alter.  However, you can use another piece of magnet and some adhesive to back the pots that won't stick.  (I only had one off brand set that was aluminum.)  The great part is that being magnetic, you can rearrange them endlessly.  I also had a couple almost empty lipsticks, so I scooped out what was left in the tube and squished it into a clean empty pot using a palette knife.  (Waste not, want not!  Hehe )


I even added some magnet sheet to one of the larger blush containers, so I could travel lighter when needed.  This whole thing also works with the smaller CD cases.

TIP:  If you remove the fronts of another DVD/CD cases, you can use them lined with magnet sheets or velcro compatible fabric for a DIY Beauty Butler to hold your brushes, tube lipstick, mascara, eyeliners, etc...  (The black protector cover pictured in the 1st pic is actually an old Samsung tablet cover.  They make some really nice cover s these days that could work really well for this.)

Hope you find these tips useful!  Until next time be craftabulous!