Pages

Saturday, August 25, 2012

Miss Witch's Ogrehide Witch BOO't available in time for Halloween


Miss Witch's Ogrehide Boots

Miss Witch met an ogre named Clyde,
who quite unexpectedly died.
He was useless in life.
Always caused others strife.
But, his hide made fine boots when dried.

Miss Witch then went for a ride
in her new boots of green ogrehide.
She blushed top to bottom
when asked where she got'em.
"Off an ogre named Clyde", she replied.

by mieljolie, ©2012


New Witch BOO't finished and available on Etsy!  This is a small sized one standing about 8" tall and 7.5" long and is painted to look like an ogre's hide all stitched up into a boot.  It has an eye peeking out on one side and a colorful spider on the other with a few flies landing everywhere on the sides and tongue. 


There are two more flies on the tongue in front.  I used a brown nylon cord for the lace. I had thought about using a color that would match the bright green stitches, but decided the brown would tie in the tree stump heel better.


Close up detail of the spider and a fly on the left side and of the eye on the right side. (Click images to see larger versions)  I think I've been inspired a lot by the many spiders we seem to be finding around our house these days.  We've seen orb weavers, wolf spiders, cob web or house spiders, and our family favorites the many colors of jumping spider, among others.  Jumping spiders are the only ones we allow to stay inside.  The are fairly harmless, secluded, and territorial.  So, they keep all the other creepy crawlies at bay. The rest get cupped up and sent back out to the "wild".


It was rather relaxing (and just a wee bit tedious) painting all the stitches.  I may revisit this theme again in the future.  But perhaps in a more deliberate symetrical fashion or just on portions of a boot. 


I'll be trying to finish up some larger BOO'ts next along with some costuming.  One boot may have a haunted house theme.  Hope to have at least one more completed by Halloween.  **Knocks on ogre-hide boot's faux wood heel**  ;)

Friday, August 24, 2012

Meet Verotica Lake, the Zombie Doll


...the newest member of the daughter's Monster doll collection.  She's decomposing a bit.  The fish must have been nibbling on her before they retrieved her from the water.  Bet you didn't know that your stuffies have stuffed bones in them, did ya?!    ;) 


Daughter and I just finished up the last joint project before she goes back to school next week.  Verotica's missing eye and a head injury are hidden behind her hair in a style sorta inspired by the actress/model from the 40's, Veronica Lake. The doll was made using Batsy's pattern like the other monster dolls, that we've been making using polar fleece remnants.


Daughter drew out the plan for her before we started.   She wrote what colors the pieces were to be.  And, even drew up her maggot pet way up in the top let corner.  She also helped sew the face with button eye.


After we were finished with Verotica, daughter then made her a dress with a scrap of glow-in-the-dark skull/crossbone fabric and the maggot pet out of yarn. 


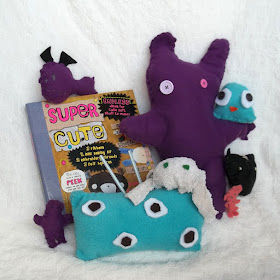
Daughter has been really busy making other stuffies this summer.  I posted about some back when summer started.  Here are some more she came up with after reading her "Super Cute" book. From Top Left to Bottom Right:

1.  "Gothy", the Gothic Bat Fish inspired by Pet Soceity on Facebook
2.  "Flo", the pooka inspired by Totoro
3.  "Peppy", an egg warmer from her book, which is sewn shut on the bottom
4.  "Hoo Dude", the mini voodoo doll,
5.   UFO (Unidentified Fluffy Object), a long alien cushion inspired by book
6.  "Sally", the Septapuss inspired by book
7.  "Stinker" a skunk petling baby inspired by Pet Society
8.  "Peach", a mini mascot inspired by book

While I'm busy working on Halloween decorations and costumes, I just thought I'd share some of these sewing projects.  Hope you've enjoyed seeing them.  Next, I hope I'll be posting about another witch BOO't.  But, if not I'll most likely be posting about some of Mr Sam's projects and hopefully some further progress on more pixies.  (Yes, the whole family has been busy crafting! Isn't it great!?!)  Until then, keep up the crafting, too!

Thursday, August 23, 2012

Free Felt Bat Pattern for Halloween


Sure wishing the weather would start cooling off here.  I'm so ready for fall and Halloween to get here.  Oh, but wait!  Then I'd have to have all these projects done!  Nevermind.  :) 

While the daughter was busy sewing her felt/polar fleece stuffies this summer, I sat down with her a few times to create this bat for her. 


He's about 10" wide and 3.5" tall and made with mostly felt scrap, a piece of chenille stem and some buttons. The chenille stem makes the wings slightly posable.  I have to say that, though I enjoyed myself, handsewing the entire thing has really made me appreciate my sewing machine.


If you'd like to make one of these, I've put together a free pattern with some brief instructions on Craftsy.com:


http://www.craftsy.com/pattern/sewing/toy/felt-button-bat/160384 - I'd really love to hear if you give it a try!

BTW, while I was making my bat, the daughter tried her hand at a baby bat, too. :)  Isn't it adorable?! It's pretty small at only 4" in length.  She gave it to me and it is now sitting on my computer speaker until I find it a better spot.  She's still at the stuffy making frenzie.  I'll post some more of her work, soon.


Hope you're having a crafty time! 

Wednesday, August 22, 2012

The "Pointy Kitty"

We came across an adorable and fairly simple free sewing pattern for what is referred to as the "Pointy Kitty" from Hillary Lang with WeeWonderfuls.  Grandma gave it a try with some Halloween "BOO" printed fabric we had.  And, the daughter helped sew on the orange button eyes.    
   

She had a bit of trouble getting it to stand up because she didn't use enough stuffing in the legs.  If you try this pattern, be sure to stuff the body as tightly as you can, unless you want a lazy kitty. The head can get really heavy, so I'd go much lighter in the stuffing on it.


The daughter, bless her heart, decided to help it stand better.  She CUT it open and restuffed it better.  :o  This is why the legs are a bit knock-knee'd.  But, I'm proud of her for taking the initiative to fix it.


After the black one was finished, the daughter decided to give it a try with polar fleece.  She chose some bright red scrap and said it was much easier to work with.  She hand-sewed the entire thing, which, to me, is pretty impressive.  This cat is about 8" long, which isn't as small as the stuffies she has been making.  That is a lot of stitched! 


I believe this is actually the first pattern she has followed, too.  Her sewing book more or less just explains how to make things and you have to draw up the pieces yourself.  But, she did a great job reading it though this pattern to understand it before cutting/sewing.  Her red kitty stood up purrrfectly the first attempt.  ;)


In other news, Grandma is back to working on Pixies and House Elves by request.  She's busy assembling pieces.  We've got to get busy doing some eye experiements since we're having difficulty finding the ones we'd like to use.  But, I think I've got a solution that should work.  Wish me luck.!  I'll be posting more about some other sewing projects the daughter and I have been working on this summer in my next post.

Friday, August 17, 2012

BURN BABY BURN (A Boogie Bogie) - Paper Mache Pumpkin Pump available on Etsy


When the rays of the day were all gone,
Miss Witch let loose on the lawn.
In her new pumpkin pumps,
she jumped on a stump,
and boogied 'til the break of dawn.

But, her hell-raising romp was through,
when she had kicked off her left boogie shoe.
It flew to the east
hundreds of miles, at least.
Where it went, she never knew.

It was spotted on NASA's radar,
as it burned by the shining North star
An unexplained blip,
on a short little trip,
nearly causing a 3rd World War.

by mieljolie, © 2012


Getting jazzed up and into the Halloween spirit again!  Check out my new Witch Shoe on Etsy!  This one's kind a has a retro rockabilly meets disco flare to it.  It was a lot of fun.  I enjoyed the challenge of a new shape to work with.  I did something a bit different by opting not to put the moon on the toe this time.  Haven't abandoned the moons completely or anything, though.  Just trying new things.


So proud of myself for getting it done and listed in time for Halloween. It's only taken two years.  (Ack, so long!  Really sorry about how few I finished last year.)  But, honestly, I definitely find listing them to be the most stressful part. So many details to figure out. I hope I've done an adequate job, especially in displaying and describing it.  I'd rather play in the paper mache paste and paint.  :)

Anyhow, I'm working on a small boot with an unusual theme that will probably be done next.  Then, I hope to put some finishng touches on another shoe for my sis and then on to a medium or large boot that may or may not be up in time for Halloween 2012.  Wish me luck, inspiration...and a steady hand! 

Monday, August 6, 2012

Porkpie and a Cocktail - 1 Hat into 2


Be amazed as I tell you how we turned one ordinary unassuming cowboy hat into not one...but TWO totally new hat creations just like magic!  Yes, you read that right.  We created this porkpie hat for Mr. Sam...


...and a cocktail hat for me... 


...out of one used cowboy hat!  Well, okay, it might not be too terribly "amazing" or "like magic" in any way.  But, it is definitely thrifty, right?! :) 

Not so recently we acquired another cowboy hat (this one is from my dad who heard us yammering about our interest in reshaping felt hats).  Right away Mr. Sam had started making it into a short top hat style like the previous brown one, but he didn't like how it was turning out due to the red vent holes on the sides and gave up.  After it sat for awhile in our craft shelf, I finally pulled it down, reshaping and shortening it even more on top to the porkpie style we've come to know and love. 


This one is much shallower than the brown one because of the deeper fold.  When he put it on I kinda thought he reminded me slightly of when Johnny Depp wore a porkpie in "Benny and Joone", except that this one is black and the brim is shaped slightly different.


After finishing it, I don't think the red rivets look so bad.  Though, I think it would be nice with an extra wide hadband with red in it.  You think?  I'm contemplating making a band out of seed beads.  Perhaps a snake pattern or something.


Then out of the blue, I managed to pull a second hat out of the first.  Or, should that be off of it?  All I know is there's one thing we keep accumulating from all these felt hats.  (I think 8 now actually, not including our gazillion tabistry and leather hats!)  It's lots of scrap felt from the excess brims.  Cowboy hats tend to have really wide brims.  And, we keep cutting them down to about 1 1/2-2 1/2 inches, leaving me with a pile of felt rings.  And, you probably know by now that I can't throw anything away.  :)  So, the other day as I was straightening up the craft room, I was inspired by the coiling of the scrap felt as I put it up.  It looked like it would make a unique little cocktail hat for a rockabilly-ish night out.


I made a kind of tapered slanted pill box by wrapping the felt around in a more deliberate coil.  The top was then covered with a piece of scrap felt.  I embellished the front with a big black removable pin.  This way I can be indecisive and change it to match my outfit.  Like the red paper hat I posted about, I used a piece of netting (probably from produce or something), this time in black, to make a short veil.  Later, I went back and added the black lace trim.  (Forgive me for "photoshopping" the top of the hat in this pic.  I actually didn't put on the lace trim until a few days after the event.)


For this last mintue event, I just pinned the hat on my head using hairpins.  There is a ridge created just under the outer ring by the overlapping coiled strip that I secured the pins so that they weren't visible.  But, eventually I will sew in a clip/comb or two to keep it in place.  I have to say, the hairpins kept it in on my head pretty well considering how wild we can sometime dance!  :)


We had a really good time.  Watched some talented performers and, best of all, listened/danced to some great live music.  Need to do it again soon! 

In other news, I've got a mile long list of crafting to get back to on top of tutorials to write.  And, Halloween is approachng very sneakily.  So, if you don't hear from me for awhile, don't panic.  :)  I hope to have some spectacular stuff to show when I come up for air.  Until then, be craftastic!!

Thursday, August 2, 2012

Giveaway Pole Results

So, the numbers are in on the Givaway Pole Question.  When asked what you'd like to see as a prize item for the next giveaway.  The results were:

  • Steampunk Item 81%
  • Witch BOO't 9%
  • Harry Potter 9%
  • Bead Bracelet 9%
  • Cardboard Hat 0%
Interesting that you've chosen a Steampunk Item by an overwhelming margin!  After second thought,  I guess I should have been a little more specific, right?  So, I suppose I will post a new pole to help narrow down the crafting field.  :)

I may still offer other items in the giveaway.  Not sure just yet.  BUt, I think the plan will be to host it sometime in Oct or Nov.